一、对第一代壳的改良 在第一代加固壳中,会将源程序APK存储到文件系统中,然后再通过DexClassLoader动态加载。这种落地加载方式存在很大问题,一是容易在文件系统中获取到源程序APK,二是两次加载源程序APK到内存中,效率低。
第二代壳就是为了解决上述问题,做到不落地加载,即不使用文件系统作为中转站,而是直接将内存中的源APK字节码进行加载。
那么问题就来了,怎样解决加载内存dex的难题呢?
1.1 如何加载内存dex 不管是直接加载文件字节码还是借助文件系统作为中转站来加载,最终肯定是都需要解析dex文件,因此我们来看看dex文件加载源码中有没有直接加载文件字节码的方法。
具体分析详见dex文件加载流程(一) 。这里就简明说一下:
Android 4及以下,最终调用带三个参数的native方法openDexFile(),但并不接受文件字节码作为参数。然而其另一个重载方法接受字节码数组作为参数传入 ,具体如下:
Android 5~7,最终调用openDexFile()方法,里面会调用native方法openDexFileNative(),然而并不接受文件字节码作为参数。因此需要借助libart.so库中的OpenMemory()函数来实现内存加载文件字节码(需要编写native层代码实现)。
Android 8及以上,跟Android 5~7一样的流程,但是额外多了一个用于加载内存dex的类加载器InMemoryDexClassLoader,详细见InMemoryDexClassLoader加载内存dex的流程 。
不管哪种方法,它们都会返回一个cookie值,它是对dex文件进行操作的唯一凭据,可以简单理解成dex文件的“身份证”。
不管什么版本,加载dex流程中最终都会调用DexFile的构造函数,OpenMemory()函数也是一样的,也就是说,返回的这个cookie其实就是DexFile的地址!?
从上面可以看出,除了Android 8及以上版本的系统拥有一整套内存dex加载的方法(即拥有类加载器InMemoryDexClassLoader),其他版本并没有类加载器,因此面临内存dex中类加载的问题。
1.2 如何解决内存dex中类的加载问题 系统给定的类加载器DexClassLoader和PathClassLoader类加载器,在创建时只接受文件路径,也就是只接受文件系统中的dex相关文件,因此我们需要自定义类加载器,使其能够接受内存dex。而在这之前,非常有必要源码分析类的加载过程,具体分析请见Android中的ClassLoader/#四、ClassLoader加载类的过程 (Android 8源码)。简单总结一下该过程:
ClassLoader类的loadClass()方法 → BaseDexClassLoader类的findClass()方法 → DexPathList类的findClass()方法 → Element类的findClass()方法 → DexFile类的loadClassBinaryName()方法 → DexFile类的defineClass()方法 → DexFile类的defineClassNative()方法
如果仔细去看源码的话,应该可以注意到,中间的方法(3~6)都只是作为一个跳板而已,并没有加载类的代码实现,而是调用后者方法。因此我们在自定义类加载器的时候,可以跳过中间这些方法,也就是说我们要重写BaseDexClassLoader类的findClass()方法,使其能够直接调用defineClassNative()方法。
那么这里又有一个小问题,就是我们怎么获取到dex中的类名,这样才能知道要加载的类是不是dex中的,如果是,我们就要调用defineClassNative()方法来解决,如果不是,就交给父类。不过好在/libcore/dalvik/src/main/java/dalvik/system/DexFile.java中就有这样一个函数,可以通过cookie获取到dex中的所有类名,它的定义如下:
1 private static native String[] getClassNameList(Object cookie);
这样一来,问题就都解决了。接下来就是具体的实现环节了!
从Android 7 开始,defineClassNative(String name, ClassLoader loader, Object cookie)变成了defineClassNative(String name, ClassLoader loader, Object cookie, DexFile dexFile),多了一个DexFile参数。
解决方法:
传入null,查看对应源码,可以知道就是多了一步class_linker->InsertDexFileInToClassLoader(),顾名思义,应该是将DexFile文件加载到类加载器中,方便之后加载类。而加载类的过程我们自己实现了,应该不会有问题的。
刚刚上一小节说过,cookie这个其实就是个DexFile的首地址,那么我们就可以通过这个获取DexFile对象。(强转?)
为什么说cookie是地址呢,证据如下:
art/runtime/native/dalvik_system_DexFile.cc目录下的DexFile_defineClassNative函数:
Android 5.1 :第一行就是调用toDexFiles(cookie, env)函数获取DexFile对象,而且该方法定义时,第一个参数名为dex_file_address。
Android 6 ~ :第一行代码如下:
1 `std::unique_ptr<std::vector<const DexFile*>> dex_files = ConvertJavaArrayToNative (env, cookie)`
是吧,又是通过cookie得到DexFile对象!
所以说,非常肯定cookie就是DexFile的首地址
二、项目 2.1 使用一种新的加壳方法 在编写第一代壳的时候,我是用的是合并方法是脱壳程序dex + 源源程序APK并且以脱壳程序APK为寄主,但我感觉这样做缺点很大。因为源程序可能会使用到资源文件,就需要进行资源替换了。
但是我们应该注意到,脱壳程序并不需要用户界面,理应也不需要加载资源文件,只需要dex中的代码逻辑,以及在脱壳程序APK(寄主)的AndroidManifest.xml中声明Application代理类。那么我们加壳的方法可以改成这样:
之前怎么改脱壳程序的AndroidManifest.xml就怎么改源程序的AndroidManifest.xml,其实就是相当于换了个寄主而已。
Android 8及以上 Android 8及以上的系统环境中,非常好实现不落地加载壳,因为系统直接提供了相应的内存dex加载器InMemoryDexClassLoader,因此在第一代壳基础上,只需要在替换类加载器的过程中,修改创建新的类加载器的方式即可。
源程序 跟之前的一样,只不过之前改的是脱壳APK中的AndroidMainfest.xml文件,而现在改的是源程序APK的AndroidMainfest.xml文件,但内容不变。
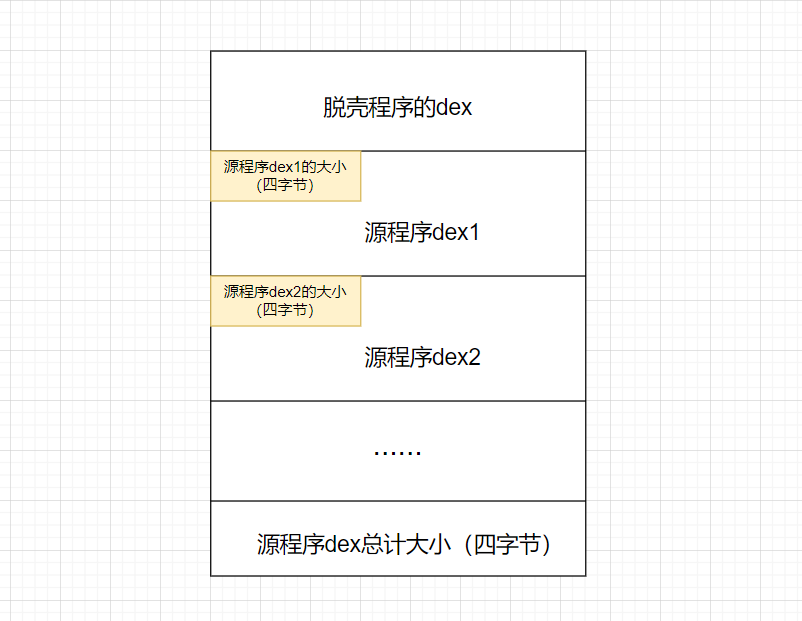
加壳程序 因为涉及到源程序多dex的情况,所以需要对代码进行修改,同时也减少了一些手动操作,具体如下:
1
2
3
4
5
6
7
8
9
10
11
12
13
14
15
16
17
18
19
20
21
22
23
24
25
26
27
28
29
30
31
32
33
34
35
36
37
38
39
40
41
42
43
44
45
46
47
48
49
50
51
52
53
54
55
56
57
58
59
60
61
62
63
64
65
66
67
68
69
70
71
72
73
74
75
76
77
78
79
80
81
82
83
84
85
86
87
88
89
90
91
92
93
94
95
96
97
98
99
100
101
102
103
104
105
106
107
108
109
110
111
from zlib import adler32from hashlib import sha1from binascii import unhexlifyimport zipfiledef fixCheckSum (dexBytesArray ):bytes (dexBytesArray[12 :]))bytearray (value.to_bytes(4 , 'little' ))for i in range (len (valueArray)):8 + i] = valueArray[i]def fixSignature (dexBytesArray ):bytes (dexBytesArray[32 :]))bytearray (unhexlify(value))for i in range (len (valueArray)):12 + i] = valueArray[i]def fixFileSize (dexBytesArray, fileSize ):bytearray (fileSize.to_bytes(4 , "little" ))for i in range (len (fileSizeArray)):32 + i] = fileSizeArray[i]def encrypto (file ):return filedef readDexsSourceApk (sourceApkPath ):with zipfile.ZipFile(sourceApkPath, "r" ) as sourceApk:for fileName in nameList:if fileName.endswith(".dex" ):with sourceApk.open (fileName) as dexfile:bytearray (dexfile.read())return dexListdef readDexFromShellApk (shellApkPath ):with zipfile.ZipFile(shellApkPath, "r" ) as sourceApk:for fileName in nameList:if fileName.endswith(".dex" ):with sourceApk.open (fileName) as dexfile:bytearray (dexfile.read())break return datadef combineSourceDexs (sourceDexList ):bytearray ()for dexfile in sourceDexList:len (dexfile)print (hex (dexfileLen))bytearray (dexfileLen.to_bytes(4 , 'little' ))return combinedDexdef forkShellLibIntoSourceApk ():pass def start ():"sourceApk.apk" "shellApk.apk" "newApk.apk" len (encSourceDex)bytearray (encSourceDexLen.to_bytes(4 , 'little' ))len (newDex)with open (r'classes.dex' , 'wb' ) as f:bytes (newDex))if __name__ == '__main__' :
对于源程序多dex的情况,先将合并源程序的dex为单独一个dex,之后的操作就跟之前的一样。
脱壳程序 RefInvoke类是我之前封装好的反射类,详细见Github仓库:https://github.com/gal2xy/RefInvoke。
attachBaseContext() 首先展示以下代理Application类中的attachBaseContext()方法:
1
2
3
4
5
6
7
8
9
10
11
12
13
14
15
16
17
protected void attachBaseContext (Context base) {super .attachBaseContext(base);try {byte [] shellDexData = readDexFromApk();"成功从源APK中读取classes.dex" );"成功分离出源dex集合" );catch (Exception e) {
readDexFromApk()方法跟之前一代壳中使用的方法一样,这里不再展示。
由于我们的目标是适配多dex的情况,所以splitSourceApkFromShellDex()方法需要修改,代码如下:
1
2
3
4
5
6
7
8
9
10
11
12
13
14
15
16
17
18
19
20
21
22
23
24
25
26
27
28
29
30
31
32
33
34
35
36
37
38
39
40
41
42
43
44
45
46
47
48
49
50
51
private ByteBuffer[] splitSourceApkFromShellDex(byte [] shellDexData) throws IOException {int shellDexlength = shellDexData.length;byte [] sourceDexsSizeByte = new byte [4 ];4 , sourceDexsSizeByte,0 ,4 );ByteBuffer wrap = ByteBuffer.wrap(sourceDexsSizeByte);int sourceDexsSizeInt = wrap.order(ByteOrder.LITTLE_ENDIAN).getInt();"源dex集合的大小: " + sourceDexsSizeInt);byte [] sourceDexsData = new byte [sourceDexsSizeInt];4 , sourceDexsData, 0 , sourceDexsSizeInt);byte []> sourceDexList = new ArrayList <>();int pos = 0 ;while (pos < sourceDexsSizeInt){byte [] singleDexSizeByte = new byte [4 ];0 ,4 );ByteBuffer singleDexwrap = ByteBuffer.wrap(singleDexSizeByte);int singleDexSizeInt = singleDexwrap.order(ByteOrder.LITTLE_ENDIAN).getInt();"当前singleDex的大小: " + singleDexSizeInt);byte [] singleDexData = new byte [singleDexSizeInt];4 , singleDexData, 0 , singleDexSizeInt);4 + singleDexSizeInt;int dexNum = sourceDexList.size();"源dex的数量: " + dexNum);new ByteBuffer [dexNum];for (int i = 0 ; i < dexNum; i++){return dexBuffers;
这里多了将源dex集合分离开来,并将它们封装成ByteBuffer。
replaceClassLoaderInLoadedApk()方法大差不差,只不过是将类加载器换成InMemoryDexClassLoader而已,当然,在代码中,我没有通过ActivityThread实例中的mPackages获取LoadedApk实例,而是通过ActivityThread实例中的mBoundApplication获取,详细原因见关于一代壳的一些理解 。
onCreate() 接下来是代理Application类中的onCreate()方法,该部分处理的是Application实例的替换,做法跟一代壳的做法一样,只不过在这里我封装了一下,具体代码就不展示了,直接去仓库看代码就行了.
Android 8以下 (ART环境下) 这中环境下还是挺难的,因为没有一套用于加载内存dex的类加载器,需要我们自己去实现,那么也就面临类加载器的实现和内存dex加载实现。该小节主要展示这两部分的代码。
类加载器的实现 由于defineNative()和getClassNameList()的参数在一些版本中有所不同,所以需要判断一下设备的SDK版本,根据不同版本编写相应的反射调用代码。
1
2
3
4
5
6
7
8
9
10
11
12
13
14
15
16
17
18
19
20
21
22
23
24
25
26
27
28
29
30
31
32
33
34
35
36
37
38
39
40
41
42
43
44
45
46
47
48
49
50
51
52
53
54
55
56
57
58
59
60
61
62
63
64
65
66
67
68
69
70
71
72
73
74
75
76
77
78
79
80
81
82
83
84
85
86
87
88
89
90
91
92
93
94
95
96
97
98
99
100
101
102
103
104
105
106
107
108
109
110
111
112
113
114
115
116
117
118
119
120
121
122
123
124
125
126
127
128
129
130
131
132
133
134
135
136
137
138
139
140
141
142
143
144
145
146
147
148
149
150
151
152
153
154
155
156
157
158
159
160
161
162
163
164
165
166
167
168
169
170
171
172
173
174
175
176
177
178
public class MyClassLoader extends DexClassLoader {private static final String TAG = "demo" ;private ArrayList<Object> cookieArray;private Context mContext;static {"androidsecondshell2" );public static native Object OpenMemory (byte [] dex, long dexlen, int sdkInt) ;public MyClassLoader (Context context, ByteBuffer[] dexBuffers, String librarySearchPath, ClassLoader parent, String dexPath, String optimizedDirectory) {super (dexPath, optimizedDirectory, librarySearchPath, parent);for (ByteBuffer dexbuffer : dexBuffers){int dexlen = dexbuffer.limit() - dexbuffer.position();"dexbuffer.capacity(): " + dexlen);byte [] dex = new byte [dexlen];"dex前3个字节: " + dex[0 ] + dex[1 ] + dex[2 ]);Object cookie = OpenMemory(dex, dexlen, Build.VERSION.SDK_INT);@Override protected Class<?> findClass(String name) throws ClassNotFoundException {null ;this .cookieArray);int classNameNum = classNameList.size();"dex num: " + classNameNum);for (int cookiePos = 0 ; cookiePos < classNameNum; cookiePos++){for (int classPos = 0 ; classPos < singleClassNameList.length; classPos++){"className: " + singleClassNameList[classPos]);if (singleClassNameList[classPos].equals(name)){'.' , '/' ),this .mContext.getClassLoader(),this .cookieArray.get(cookiePos)else {'.' , '/' ),this .mContext.getClassLoader(),this .cookieArray.get(cookiePos)if (clazz == null ){super .findClass(name);return clazz;@Override protected Class<?> loadClass(String name, boolean resolve) throws ClassNotFoundException {"loadClass: " + name + "resolve: " + resolve);super .loadClass(name, resolve);if (clazz == null ){"loadClass failed" );return clazz;private Class defineClassNative (String name, ClassLoader loader, Object cookie) {null ;if (Build.VERSION.SDK_INT < 23 ){"dalvik.system.DexFile" ,"defineClassNative" ,new Class []{String.class, ClassLoader.class, long .class},null ,new Object []{name, loader, (long ) cookie}else if (Build.VERSION.SDK_INT == 23 ){"dalvik.system.DexFile" ,"defineClassNative" ,new Class []{String.class, ClassLoader.class, Object.class},null ,new Object []{name, loader, cookie}else {"dalvik.system.DexFile" ,"defineClassNative" ,new Class []{String.class, ClassLoader.class, Object.class, DexFile.class},null ,new Object []{name, loader, cookie, null } return clazz;private ArrayList<String[]> getClassNameList(ArrayList<Object> cookieArray) {new ArrayList <String[]>();int cookieNum = cookieArray.size();if (Build.VERSION.SDK_INT < 23 ){for (int i = 0 ; i < cookieNum; i++){"dalvik.system.DexFile" ,"getClassNameList" ,new Class []{long .class},null ,new Object []{(long )cookieArray.get(i)}else {for (int i = 0 ; i < cookieNum; i++){"dalvik.system.DexFile" ,"getClassNameList" ,new Class []{Object.class},null ,new Object []{cookieArray.get(i)}return classNameList;private void setContext (Context context) {this .mContext = context;private void addIntoCookieArray (Object cookie) {this .cookieArray.add(cookie);
内存dex加载实现(Native层) 大部分都是参考Frezrik/Jiagu: Android apk jiagu (github.com) 的。
使用libart.so中的openMemory方法需要使用到两个关键函数:
dlopen():dlopen函数以指定模式打开指定的动态链接库文件,并返回一个句柄供dlsym()使用。dlsym():根据动态链接库操作句柄与符号,返回符号对应的地址。使用这个函数不但可以获取函数地址,也可以获取变量地址。
dlsym()第二个参数可以是JNINativeMethod或DalvikNativeMethod 结构体(存放Native 方法与 JNI 层函数的对应关系),也可以是函数在内存中的方法名。由于openMemory方法所在的/art/runtime/dex_file.cc中并没有这种结构体,所以只能使用第二种方法。至于怎么获取函数在内存中的方法名,可以参考hook加载libart.so中的OpenMemory函数 。简单来说,就是IDA打开libart.so文件,找到对应的函数,右键Edit function就可以知道了。
不知道对不对,因为安装不了所以无法测试,见下一小节
1 2 3 4 5 6 7 8 9 10 11 12 13 14 15 16 17 18 19 20 21 22 23 24 25 26 27 28 29 30 31 32 33 34 35 36 37 38 39 40 41 42 43 44 45 46 47 48 49 50 51 52 53 54 55 56 57 58 59 60 61 62 63 64 65 66 67 68 69 70 71 72 73 74 75 76 77 78 79 80 81 82 83 84 85 86 87 88 89 90 91 92 93 94 95 96 97 98 99 100 101 102 103 104 105 106 107 108 109 110 111 112 113 114 115 116 117 118 119 120 121 122 123 124 125 126 127 128 129 130 131 132 133 134 135 136 137 138 139 140 141 142 143 144 145 146 147 148 149 150 151 152 153 154 155 156 157 158 159 160 161 162 163 164 165 166 167 #include <jni.h> #include <string> #include <dlfcn.h> #include <android/log.h> #include <cstdint> #define LOGE(...) __android_log_print(ANDROID_LOG_ERROR, "Tag" , __VA_ARGS__) #define OpenMemory21 "_ZN3art7DexFile10OpenMemoryEPKhjRKNSt3__112basic_stringIcNS3_11char_traitsIcEENS3_9allocatorIcEEEEjPNS_6MemMapEPS9_" #define OpenMemory22 "_ZN3art7DexFile10OpenMemoryEPKhjRKNSt3__112basic_stringIcNS3_11char_traitsIcEENS3_9allocatorIcEEEEjPNS_6MemMapEPKNS_7OatFileEPS9_" #define OpenMemory23 "_ZN3art7DexFile10OpenMemoryEPKhjRKNSt3__112basic_stringIcNS3_11char_traitsIcEENS3_9allocatorIcEEEEjPNS_6MemMapEPKNS_10OatDexFileEPS9_" typedef void *(*org_artDexFileOpenMemory21)(const uint8_t *base,size_t size,const std::string &location,uint32_t location_checksum,void *mem_map,typedef void *(*org_artDexFileOpenMemory22)(const uint8_t *base,size_t size,const std::string &location,uint32_t location_checksum,void *mem_map,const void *oat_file,typedef std::unique_ptr <const void *> (*org_artDexFileOpenMemory23)(const uint8_t *base,size_t size,const std::string &location,uint32_t location_checksum,void *mem_map,const void *oat_dex_file,static const size_t kSha1DigestSize = 20 ;struct Header uint8_t magic_[8 ];uint32_t checksum_; uint8_t signature_[kSha1DigestSize];uint32_t file_size_; uint32_t header_size_; uint32_t endian_tag_;uint32_t link_size_; uint32_t link_off_; uint32_t map_off_; uint32_t string_ids_size_; uint32_t string_ids_off_; uint32_t type_ids_size_; uint32_t type_ids_off_; uint32_t proto_ids_size_; uint32_t proto_ids_off_; uint32_t field_ids_size_; uint32_t field_ids_off_; uint32_t method_ids_size_; uint32_t method_ids_off_; uint32_t class_defs_size_; uint32_t class_defs_off_; uint32_t data_size_; uint32_t data_off_; void * artHandle = nullptr ;void * loadDexInAndroid5 (int sdk_int, const char *base, size_t size) std::unique_ptr<const void *> loadDexAboveAndroid6 (const char *base, size_t size) ;extern "C" JNIEXPORT jobject * JNICALL Java_com_example_androidsecondshell2_MyClassLoader_OpenMemory (JNIEnv *env, jclass clazz, jbyteArray dex, jlong dexlen, jint sdk_int) void * value;if (sdk_int < 22 ) {loadDexInAndroid5 (sdk_int,(char *)dex,(size_t )dexlen);else {loadDexAboveAndroid6 ((char *)dex,(size_t )dexlen).get ();if (!value){LOGE ("fail to load dex" );return (jobject*) value;void * loadDexInAndroid5 (int sdk_int, const char *base, size_t size) "Anonymous-DexFile" ;void * value;const auto *dex_header = reinterpret_cast <const Header *>(base);if (sdk_int == 21 ) {auto func21 = (org_artDexFileOpenMemory21) dlsym (artHandle, OpenMemory21);func21 ((const unsigned char *) base,size_t )size,nullptr ,else if (sdk_int == 22 ) {auto func22 = (org_artDexFileOpenMemory22) dlsym (artHandle, OpenMemory22);func22 ((const unsigned char *) base,nullptr ,nullptr ,if (!value){LOGE ("fail to load dex in Android 5" );return value;std::unique_ptr<const void *> loadDexAboveAndroid6 (const char *base, size_t size) {"Anonymous-DexFile" ;const void *> value;const auto *dex_header = reinterpret_cast <const Header *>(base);auto func23 = (org_artDexFileOpenMemory23) dlsym (artHandle, OpenMemory23);func23 ((const unsigned char *) base,nullptr ,nullptr ,if (!value) {LOGE ("fail to load dex in Android 6 and above" );return nullptr ;return value;JNIEXPORT jint JNI_OnLoad (JavaVM* vm, void * reserved) {void *)dlopen ("libart.so" , RTLD_LAZY);
三、出现的问题 在Android 8以下的环境下,因为脱壳程序会需要lib库,所以我将脱壳APK中的lib目录直接拖到源程序APK中(在此之前,源程序APK并没有lib目录),于是乎就出现这样的问题:
1
2
adb: failed to install SourceApk_sign.apk: Failure [INSTALL_FAILED_INVALID_APK: Failed to extract native libraries, res=-2 ]
可我使用 zipalign 工具后,仍然安装失败!
(先搁置一下吧😔)
——————
直接对源程序动手,创建一个新的源程序,选择成native开发,代码复制过来,可以解决上述问题。
但仍然存在新的问题,native层的成功打开libart.so文件,但是报错:
1
2
3
4
5
open libart.so success //这是我用LOGE输出的with uncaught exception of type std::bad_alloc: 6 (SIGABRT), code -6 in tid 27489 (ample.sourceapk)'google /marlin/marlin:7
可是我没分配内存啊?哪来的bad_alloc?
参考:
Android中apk加固完善篇之内存加载dex方案实现原理(不落地方式加载) | 尼古拉斯.赵四 (520monkey.com)
Android加壳与脱壳(11)——不落地加载的对抗研究
Frezrik/Jiagu: Android apk jiagu (github.com)
[原创]安卓加固方案从落地加载到类指令抽取编写报告-Android安全-看雪-安全社区|安全招聘|kanxue.com
[原创]Android App加固原理与技术历程-Android安全-看雪-安全社区|安全招聘|kanxue.com
安卓各版本源码
Android最新版本号与API级别对应关系(更新到android13)_android 13 api版本-CSDN博客
hook加载libart.so中的OpenMemory函数