一、前言
学习加壳之前,建议先把前置知识学习再说。我们需要先学习dex文件结构、java反射、Android中的ClassLoader、Application以及它的加载流程、App启动流程。
不然我真不建议直接莽它,不懂原理只能学到皮毛!
二、第一代加固壳原理
第一代加固壳原理如下图所示:
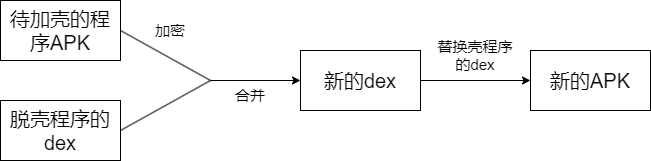
在图中涉及到三个程序:
- 待加壳程序的APK(源程序APK)
- (脱)壳程序APK(负责解密源程序APK并加载运行它)
- 加壳程序(将源程序APK进行加密并与壳程序的dex合并成新的dex)。
主要步骤如下:
首先利用加密算法对源程序APK进行加密,然后与脱壳程序APK合并得到新的dex文件,最后替换脱壳程序中的dex文件即可。之后运行合并后的程序时,会通过壳程序对源程序进行解密和运行时加载,这样一来,源程序就能正常运行。合并示意图如下:
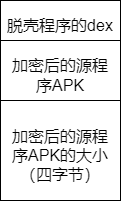
学过dex文件结构后,我们可以知道:对于合并后的dex文件,需要修改其dex_header中的三个字段:
- checksum:dex文件(除
magic、checksum)的校验和(使用adler32算法),通过它来判断dex文件是否被损坏或篡改。
- signature:dex文件(除
magic、checksum 和signature之外的所有内容)的 SHA-1 签名(哈希),用于对文件进行唯一标识。
- file_size:整个dex文件的大小。
接下来我们就通过案例来深入学习一下。
三、案例
3.1 源程序APK
随便来一个简单的apk。activity_main.xml文件中简简单单填一个textview控件展示文字即可。MainActivity代码如下:
1
2
3
4
5
6
7
8
9
| public class MainActivity extends Activity {
String TAG = "demo";
@Override
protected void onCreate(Bundle savedInstanceState) {
super.onCreate(savedInstanceState);
setContentView(R.layout.activity_main);
Log.d(TAG, "SourceMainActivity onCreate: " + getApplicationContext());
}
}
|
另外需要一个Application类(不需要在源程序的ActivityManifest.xml文件中注册):
1
2
3
4
5
6
7
8
| public class MyApplication extends Application {
String TAG = "demo";
@Override
public void onCreate() {
super.onCreate();
Log.d(TAG, "SourceApk onCreate: " + this);
}
}
|
问题来了,为什么需要自定义Application类呢?
其实Application即使不创建,系统也会帮我们创建的。但是创建自定义Application类是为了方便反射获取Application类,进而创建源程序的Application实例来替换原有的壳程序的Application实例。
3.2 加壳程序
根据加壳流程,很容易实现这部分,主要功能是加密源程序APK、合并成新的dex文件、修正三个字段。这里我觉得用python来实现更简便点。
1
2
3
4
5
6
7
8
9
10
11
12
13
14
15
16
17
18
19
20
21
22
23
24
25
26
27
28
29
30
31
32
33
34
35
36
37
38
39
40
41
42
43
44
45
46
47
48
49
50
51
52
53
54
55
56
57
58
59
60
61
62
63
64
65
66
67
| from zlib import adler32
from hashlib import sha1
from binascii import unhexlify
def fixCheckSum(dexBytesArray):
value = adler32(bytes(dexBytesArray[12:]))
valueArray = bytearray(value.to_bytes(4, 'little'))
for i in range(len(valueArray)):
dexBytesArray[8 + i] = valueArray[i]
def fixSignature(dexBytesArray):
sha_1 = sha1()
sha_1.update(bytes(dexBytesArray[32:]))
value = sha_1.hexdigest()
valueArray = bytearray(unhexlify(value))
for i in range(len(valueArray)):
dexBytesArray[12 + i] = valueArray[i]
def fixFileSize(dexBytesArray, fileSize):
fileSizeArray = bytearray(fileSize.to_bytes(4, "little"))
for i in range(len(fileSizeArray)):
dexBytesArray[32 + i] = fileSizeArray[i]
def encrypto(file):
for i in range(len(file)):
file[i] ^= 0xff
return file
def start():
with open(r'SourceApk.apk', 'rb') as f:
SourceApkArray = bytearray(f.read())
with open(r'shellApk.dex', 'rb') as f:
shellDexArray = bytearray(f.read())
SourceApkLen = len(SourceApkArray)
shellDexLen = len(shellDexArray)
newDexLen = shellDexLen + SourceApkLen + 4
enApkArray = encrypto(SourceApkArray)
newDexArray = shellDexArray + enApkArray + bytearray(SourceApkLen.to_bytes(4, 'little'))
fixFileSize(newDexArray, newDexLen)
fixSignature(newDexArray)
fixCheckSum(newDexArray)
with open(r'classes.dex', 'wb') as f:
f.write(bytes(newDexArray))
if __name__ == '__main__':
start()
|
3.3 脱壳程序
3.3.1 先分析一波
这部分理解起来很难也是整个项目最关键的部分!
这部分主要是在壳Application类中做如下事情:
- 创建源程序的DexClassLoader实例替换LoadedApk中的mClassLoader。
- 创建源程序的Application实例替换壳程序的Application实例。
接下来就解释一下为什么这么做。
为什么要替换LoadedApk中的mClassLoader?
因为我们的源程序肯定是要依靠ClassLoader动态加载的,而ClassLoader存放了应用所需的类库,如下所示:
1
2
3
4
5
6
7
| dalvik.system.DexClassLoader[
DexPathList[
[zip file "/data/user/0/com.example.shellapk/app_payload_dex/Source.apk"],
nativeLibraryDirectories
= [/data/user/0/com.example.shellapk/app_payload_lib, /system/lib64, /product/lib64]
]
]
|
当需要加载某些类时,就会开始双亲委托模式寻找,而父类加载器以及祖先加载器里面肯定是没有源程序所需要的类的,因而也不可能加载成功,所以我们就需要创建一个新的DexClassLoader来替换壳程序的ClassLoader,由于里面包含源程序的类,这样一来,就可以成功加载源程序。
怎么替换LoadedApk中的mClassLoader?
至于怎么替换,就有好几种方法了,例如:
替换类加载器
替换壳程序的ClassLoader为源程序的DexClassLoader,同时设置源程序的DexClassLoader的父加载器为壳程序的ClassLoader的父加载器。
插入类加载器
打破原有的双亲关系,在壳程序的ClassLoader和其父加载器之间插入源程序的DexClassLoader。
合并dexElements
将壳程序的ClassLoader中的dexElements与源程序的DexClassLoader中的dexElements合并,仍使用壳程序的ClassLoader。
详细可参考加壳App的运行流程及ClassLoader修正 | Security (svip.dev)
为什么要替换Application?
因为Application做为整个应用的上下文,它的生命周期就是整个应用程序的生命周期,它还会与Activity、Service等组件有交互关系。对于壳程序和源程序,它们对应的Application实例不一定相同,为了维护应用的正常生命周期,所以需要进行替换。
你可以认为Application就代表着整个APP,Application都不同,那运行的App能是一样的吗?
怎么替换Application?
多琢磨代码你才能明白。我这里就简要说明一下:
我们需要将壳程序的Application(也就是mApplication)从ActivityThread实例中的mAllApplications中删除。之后设置LoadedApk实例中的mApplication字段为null,这样才能调用LoadedApk类的makeApplication()方法创建源程序的Application实例(也是反射,需要获取到源Application类名,我们可以通过在壳程序的ActivityManifest.xml中使用<meta-data>标签填写并在代码中获取)。当然ContentProvider也会有Application实例,也是需要替换的。最后运行源程序的Application实例的onCreate()方法,这样源程序才开始它的运行生命周期。详细可参考插件化之动态替换application.md。
为什么选择Application类作为脱壳代码执行的地方?
因为Application是整个应用程序的入口点,它的创建早于任何一个Activity、Service的创建(ContentProvider例外),因此壳程序必须在Android系统启动组件之前运行,完成源程序的解密和动态加载,否则会使程序出现加载类失败的异常,所以选择这里作为脱壳代码执行的地方。
其次,Application类的attachBaseContext()方法比onCreate()方法先执行(看Application创建的源码或者自定义Application类并利用log输出试一试)。
利用这一特性,我们就可以在attachBaseContext()方法中替换壳程序的ClassLoader,在onCreate()方法中替换Application。(为什么呢?我是解释不出来。直接全在attachBaseContext中完成不行吗?)
尝试了一下,其实全在attachBaseContext()方法或者全在onCreate()方法中执行都行的!
但都在attachBaseContext()方法执行会有缺陷,就是ActivityThread实例中的mInitialApplication又会被壳程序的Application替换掉,可以参考关于一代壳的一些理解的分析
有了上述的解释之后,我想接下来解析代码就简单一些了!
3.3.2 attachBaseContext()中所需要做的工作
首先要在Application类的attachBaseContext()方法中完成对源程序的解密和分离,并动态加载源程序apk。
1
2
3
4
5
6
7
8
9
10
11
12
13
14
15
16
17
18
19
20
21
22
23
24
25
26
27
28
29
| protected void attachBaseContext(Context base) {
super.attachBaseContext(base);
try {
File dex = getDir("payload_dex", MODE_PRIVATE);
File lib = getDir("payload_lib", MODE_PRIVATE);
dexPath = dex.getAbsolutePath();
libPath = lib.getAbsolutePath();
Log.d(TAG, "dexPath: " + dexPath);
Log.d(TAG, "libPath: " + libPath);
apkFileName = dex.getAbsolutePath() + File.separator + "Source.apk";
Log.d(TAG, "apkFileName: " + apkFileName);
File dexFile = new File(apkFileName);
if (!dexFile.exists()) {
dexFile.createNewFile();
byte[] shellDexData = readDexFromApk();
splitSourceApkFromShellDex(shellDexData);
}
replaceClassLoaderInLoadedApk();
} catch (Exception e) {
Log.d(TAG, "attachBaseContext: " + Log.getStackTraceString(e));
}
}
|
3.3.2.1 readDexFromApk()
主要功能是从壳APK中找到dex文件并读取出来。
1
2
3
4
5
6
7
8
9
10
11
12
13
14
15
16
17
18
19
20
21
22
23
24
25
26
27
28
29
30
31
32
33
34
35
36
37
38
39
| private byte[] readDexFromApk() throws IOException {
String sourceDir = this.getApplicationInfo().sourceDir;
Log.d(TAG, "this.getApplicationInfo().sourceDir: " + this.getApplicationInfo().sourceDir);
FileInputStream fileInputStream = new FileInputStream(sourceDir);
BufferedInputStream bufferedInputStream = new BufferedInputStream(fileInputStream);
ZipInputStream zipInputStream = new ZipInputStream(bufferedInputStream);
ByteArrayOutputStream byteArrayOutputStream = new ByteArrayOutputStream();
while(true){
ZipEntry zipEntry = zipInputStream.getNextEntry();
if (zipEntry == null){
break;
}
if (zipEntry.getName().equals("classes.dex")){
byte[] bytes = new byte[1024];
while(true){
int i = zipInputStream.read(bytes);
if (i == -1){
break;
}
byteArrayOutputStream.write(bytes,0, i);
}
}
zipInputStream.closeEntry();
}
zipInputStream.close();
return byteArrayOutputStream.toByteArray();
}
|
3.3.2.2 splitSourceApkFromShellDex()
主要功能是从壳dex中分理处源程序apk,存储源程序apk,提取源apk中的本地库文件。
1
2
3
4
5
6
7
8
9
10
11
12
13
14
15
16
17
18
19
20
21
22
23
24
25
26
27
28
29
30
31
32
33
34
35
36
37
38
39
40
41
42
43
44
45
46
47
48
49
50
51
52
53
54
55
56
57
58
59
60
61
| private void splitSourceApkFromShellDex(byte[] shellDexData) throws IOException {
int shellDexlength = shellDexData.length;
byte[] sourceApkSizeByte = new byte[4];
System.arraycopy(shellDexData,shellDexlength - 4, sourceApkSizeByte,0,4);
ByteBuffer wrap = ByteBuffer.wrap(sourceApkSizeByte);
int sourceApkSizeInt = wrap.order(ByteOrder.LITTLE_ENDIAN).getInt();
byte[] sourceApkData = new byte[sourceApkSizeInt];
System.arraycopy(shellDexData,shellDexlength - sourceApkSizeInt - 4, sourceApkData, 0, sourceApkSizeInt);
sourceApkData = decryptoSourceApk(sourceApkData);
File apkfile = new File(apkFileName);
try {
FileOutputStream apkfileOutputStream = new FileOutputStream(apkfile);
apkfileOutputStream.write(sourceApkData);
apkfileOutputStream.close();
}catch (IOException e){
throw new IOException(e);
}
FileInputStream fileInputStream = new FileInputStream(apkfile);
BufferedInputStream bufferedInputStream = new BufferedInputStream(fileInputStream);
ZipInputStream zipInputStream = new ZipInputStream(bufferedInputStream);
while (true){
ZipEntry nextEntry = zipInputStream.getNextEntry();
if (nextEntry == null){
break;
}
String name = nextEntry.getName();
if (name.startsWith("lib/") && name.endsWith(".so")){
String[] nameSplit = name.split("/");
String soFileStorePath = libPath + File.separator + nameSplit[nameSplit.length - 1];
File storeFile = new File(soFileStorePath);
storeFile.createNewFile();
FileOutputStream fileOutputStream = new FileOutputStream(storeFile);
byte[] bytes = new byte[1024];
while(true){
int i = zipInputStream.read(bytes);
if(i == -1){
break;
}
fileOutputStream.write(bytes,0,i);
}
fileOutputStream.flush();
fileOutputStream.close();
}
zipInputStream.closeEntry();
}
zipInputStream.close();
}
|
3.3.2.3 decryptoSourceApk()
主要功能就是解密源APK,这没啥好解释的。
1
2
3
4
5
6
7
| private byte[] decryptoSourceApk(byte[] sourceApkdata) {
for (int i = 0; i < sourceApkdata.length; i++){
sourceApkdata[i] ^= 0xff;
}
return sourceApkdata;
}
|
3.3.2.4 replaceClassLoaderInLoadedApk()
主要功能是替换壳程序的ClassLoader为新建的源程序的DexClassLoader。
1
2
3
4
5
6
7
8
9
10
11
12
13
14
15
16
17
18
19
20
21
22
23
24
25
26
27
28
29
30
31
32
33
34
35
36
37
38
39
40
41
42
43
44
45
46
47
48
49
50
51
52
53
54
55
56
57
58
59
| private void replaceClassLoaderInLoadedApk() throws Exception{
ClassLoader classLoader = this.getClassLoader();
Log.d(TAG, "classLoader get: " + classLoader.toString());
Log.d(TAG, "parent classLoader get: " + classLoader.getParent().toString());
Class<?> ActivityThreadClass = classLoader.loadClass("android.app.ActivityThread");
Log.d(TAG, "ActivityThreadClass: " + ActivityThreadClass.toString());
Field sCurrentActivityThreadField = ActivityThreadClass.getDeclaredField("sCurrentActivityThread");
Log.d(TAG, "sCurrentActivityThread: " + sCurrentActivityThreadField.toString());
sCurrentActivityThreadField.setAccessible(true);
Object sCurrentActivityThreadObj = sCurrentActivityThreadField.get(null);
Log.d(TAG, "直接反射获取ActivityThread字段: " + sCurrentActivityThreadObj.toString());
Field mPackagesField = ActivityThreadClass.getDeclaredField("mPackages");
mPackagesField.setAccessible(true);
ArrayMap mPackagesObj = (ArrayMap) mPackagesField.get(sCurrentActivityThreadObj);
Log.d(TAG, "mPackagesObj: " + mPackagesObj.toString());
String currentPackageName = this.getPackageName();
Log.d(TAG, "currentPackageName: " + currentPackageName);
WeakReference weakReference = (WeakReference) mPackagesObj.get(currentPackageName);
Object loadedApkObj = weakReference.get();
Log.d(TAG, "loadedApkObj: " + loadedApkObj.toString());
DexClassLoader dexClassLoader = new DexClassLoader(apkFileName,dexPath,libPath, classLoader.getParent());
Log.d(TAG, "dexClassLoader: " + dexClassLoader.toString());
Class<?> LoadedApkClass = classLoader.loadClass("android.app.LoadedApk");
Log.d(TAG, "LoadedApkClass: " + LoadedApkClass.toString());
Field mClassLoaderField = LoadedApkClass.getDeclaredField("mClassLoader");
mClassLoaderField.setAccessible(true);
mClassLoaderField.set(loadedApkObj, dexClassLoader);
try{
dexClassLoader.loadClass("com.example.sourceapk.MainActivity");
Log.d(TAG, "com.example.sourceapk.MainActivity: 类加载成功");
}catch (ClassNotFoundException e){
Log.d(TAG, "com.example.sourceapk.MainActivity: " + Log.getStackTraceString(e));
}
}
|
3.3.3 onCreate()中所需要做的工作
之后是Application的onCreate()方法,这里我们需要替换壳程序的Application,需要事先置LoadedApk中的mApplication为null,这样才能调用makeApplication()方法创建出源程序的Application。
1
2
3
4
5
6
7
8
9
10
11
12
13
14
15
16
17
18
19
20
21
22
23
24
25
26
27
28
29
30
31
32
33
34
35
36
37
38
39
40
41
42
43
44
45
46
47
48
49
50
51
52
53
54
55
56
57
58
59
60
61
62
63
64
65
66
67
68
69
70
71
72
73
74
75
76
77
78
79
80
81
82
83
84
85
86
87
88
89
90
91
92
93
94
95
96
97
98
99
100
101
102
103
104
105
106
107
108
109
110
111
112
113
114
115
116
117
118
119
120
121
122
123
124
125
126
127
128
129
130
131
132
133
134
135
136
137
138
139
140
141
142
143
144
145
146
147
148
149
150
151
152
153
| public void onCreate() {
super.onCreate();
Log.d(TAG, "SourceApk Application onCreate: " + this);
String appClassName = null;
try {
ApplicationInfo applicationInfo = getPackageManager().getApplicationInfo(this.getPackageName(), PackageManager.GET_META_DATA);
Bundle metaData = applicationInfo.metaData;
if (metaData != null && metaData.containsKey("APPLICATION_CLASS_NAME")){
appClassName = metaData.getString("APPLICATION_CLASS_NAME");
} else {
Log.d(TAG, "xml文件中没有声明Application类名");
return;
}
} catch (PackageManager.NameNotFoundException e) {
Log.d(TAG, Log.getStackTraceString(e));
}
ClassLoader classLoader = this.getClassLoader();
try {
Class<?> ActivityThreadClass = classLoader.loadClass("android.app.ActivityThread");
Log.d(TAG, "ActivityThreadClass: " + ActivityThreadClass.toString());
Field sCurrentActivityThreadField = ActivityThreadClass.getDeclaredField("sCurrentActivityThread");
Log.d(TAG, "sCurrentActivityThread: " + sCurrentActivityThreadField.toString());
sCurrentActivityThreadField.setAccessible(true);
Object sCurrentActivityThreadObj = sCurrentActivityThreadField.get(null);
Log.d(TAG, "直接反射获取ActivityThread字段: " + sCurrentActivityThreadObj.toString());
Field mBoundApplicationField = ActivityThreadClass.getDeclaredField("mBoundApplication");
mBoundApplicationField.setAccessible(true);
Object mBoundApplicationObj = mBoundApplicationField.get(sCurrentActivityThreadObj);
Class<?> AppBindDataClass = classLoader.loadClass("android.app.ActivityThread$AppBindData");
Field infoField = AppBindDataClass.getDeclaredField("info");
infoField.setAccessible(true);
Object infoObj = infoField.get(mBoundApplicationObj);
Log.d(TAG, "infoObj: " + infoObj.toString());
Class<?> LoadedApkClass = classLoader.loadClass("android.app.LoadedApk");
Field mApplicationField = LoadedApkClass.getDeclaredField("mApplication");
mApplicationField.setAccessible(true);
Log.d(TAG, "mApplication: " + mApplicationField.get(infoObj).toString());
mApplicationField.set(infoObj, null);
Field mInitialApplicationField = ActivityThreadClass.getDeclaredField("mInitialApplication");
mInitialApplicationField.setAccessible(true);
Object mInitialApplicationObj = mInitialApplicationField.get(sCurrentActivityThreadObj);
Log.d(TAG, "mInitialApplicationObj: " + mInitialApplicationObj.toString());
Field mAllApplicationsField = ActivityThreadClass.getDeclaredField("mAllApplications");
mAllApplicationsField.setAccessible(true);
ArrayList<Application> mAllApplicationsObj = (ArrayList<Application>)mAllApplicationsField.get(sCurrentActivityThreadObj);
mAllApplicationsObj.remove(mInitialApplicationObj);
Log.d(TAG, "mInitialApplication 从 mAllApplications 中移除成功");
Field mApplicationInfoField = LoadedApkClass.getDeclaredField("mApplicationInfo");
mApplicationInfoField.setAccessible(true);
ApplicationInfo appinfoInLoadedApk = (ApplicationInfo) mApplicationInfoField.get(infoObj);
Log.d(TAG, "appinfoInLoadedApk: " + appinfoInLoadedApk.toString());
Field appInfoField = AppBindDataClass.getDeclaredField("appInfo");
appInfoField.setAccessible(true);
ApplicationInfo appinfoInAppBindData = (ApplicationInfo) appInfoField.get(mBoundApplicationObj);
Log.d(TAG, "appinfoInLoadedApk: " + appinfoInAppBindData.toString());
appinfoInLoadedApk.className = appClassName;
appinfoInAppBindData.className = appClassName;
Log.d(TAG, "要加载的源程序application类为: " + appClassName);
Method makeApplicationMethod = LoadedApkClass.getDeclaredMethod("makeApplication", boolean.class, Instrumentation.class);
Log.d(TAG, "makeApplicationMethod: " + makeApplicationMethod.toString());
makeApplicationMethod.setAccessible(true);
Application app = (Application) makeApplicationMethod.invoke(infoObj, false, null);
Log.d(TAG, "创建源程序application成功");
mInitialApplicationField.set(sCurrentActivityThreadObj, app);
Log.d(TAG, "源程序的application成功设置到mInitialApplication字段");
Field mProviderMapField = ActivityThreadClass.getDeclaredField("mProviderMap");
Log.d(TAG, "mProviderMapField: " + mProviderMapField.toString());
mProviderMapField.setAccessible(true);
ArrayMap mProviderMapObj = (ArrayMap) mProviderMapField.get(sCurrentActivityThreadObj);
Log.d(TAG, "mProviderMapObj: " + mProviderMapObj.toString());
Iterator iterator = mProviderMapObj.values().iterator();
Log.d(TAG, "iterator: " + iterator.toString());
while(iterator.hasNext()){
Object providerClientRecord = iterator.next();
Class<?> ProviderClientRecordClass = classLoader.loadClass("android.app.ActivityThread$ProviderClientRecord");
Field mLocalProviderField = ProviderClientRecordClass.getDeclaredField("mLocalProvider");
Log.d(TAG, "mLocalProviderField: " + mLocalProviderField.toString());
mLocalProviderField.setAccessible(true);
Object mLocalProviderObj = mLocalProviderField.get(providerClientRecord);
if(mLocalProviderObj != null){
Log.d(TAG, "mLocalProviderObj: " + mLocalProviderObj.toString());
Class<?> ContentProviderClass = classLoader.loadClass("android.content.ContentProvider");
Field mContextField = ContentProviderClass.getDeclaredField("mContext");
mContextField.setAccessible(true);
mContextField.set(mLocalProviderObj,app);
}
}
Log.d(TAG, "app: " + app);
app.onCreate();
} catch (ClassNotFoundException e) {
Log.e(TAG, Log.getStackTraceString(e));
} catch (NoSuchFieldException e) {
throw new RuntimeException(e);
} catch (IllegalAccessException e) {
throw new RuntimeException(e);
} catch (NoSuchMethodException e) {
throw new RuntimeException(e);
} catch (InvocationTargetException e) {
throw new RuntimeException(e);
}
}
|
四、项目过程中出现的问题
注意!每次安装玩新的apk后,记得把之前代码创建的两个目录删除,否则就是启动之前存在的源apk。
4.1 问题一

查看了一下提取出的源程序,它不能被正常识别成apk,而且拖到jadx中反编译失败!Bandzip打开报错该文件已损坏!
010editor打开,发现连pk头都没有!估计是取源程序的时候定位错了!
额,还真是,定位初始位置的时候少减了4bytes(存储源APK大小的长度)
(这不是错误出现的原因!)
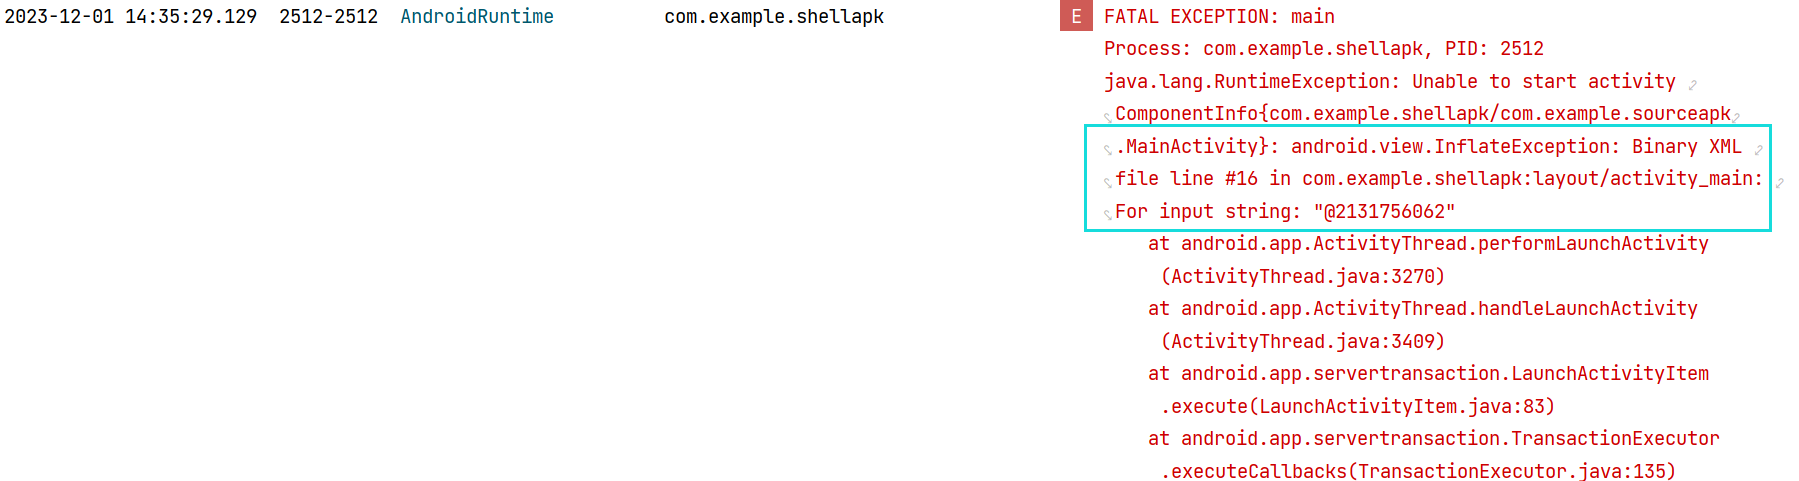
之后提取出来的源程序是正常的,能被正常识别,能被jadx反编译出原本代码,但是仍然上图的这个错误。
难道是壳APK中的ActivityMainfest.xml中没声明该Activity导致的???

果然是这样!我们需要把源程序的Activity声明搬到壳程序中,之后我的壳程序的ActivityMainfest.xml文件如下:

4.2 问题二

无法创建application,原因如下:

源程序的application类找不到???
我测!我大写了,标签中包application类名大写了,应该是sourceapk而不是sourcApk!🥲
4.3 问题三
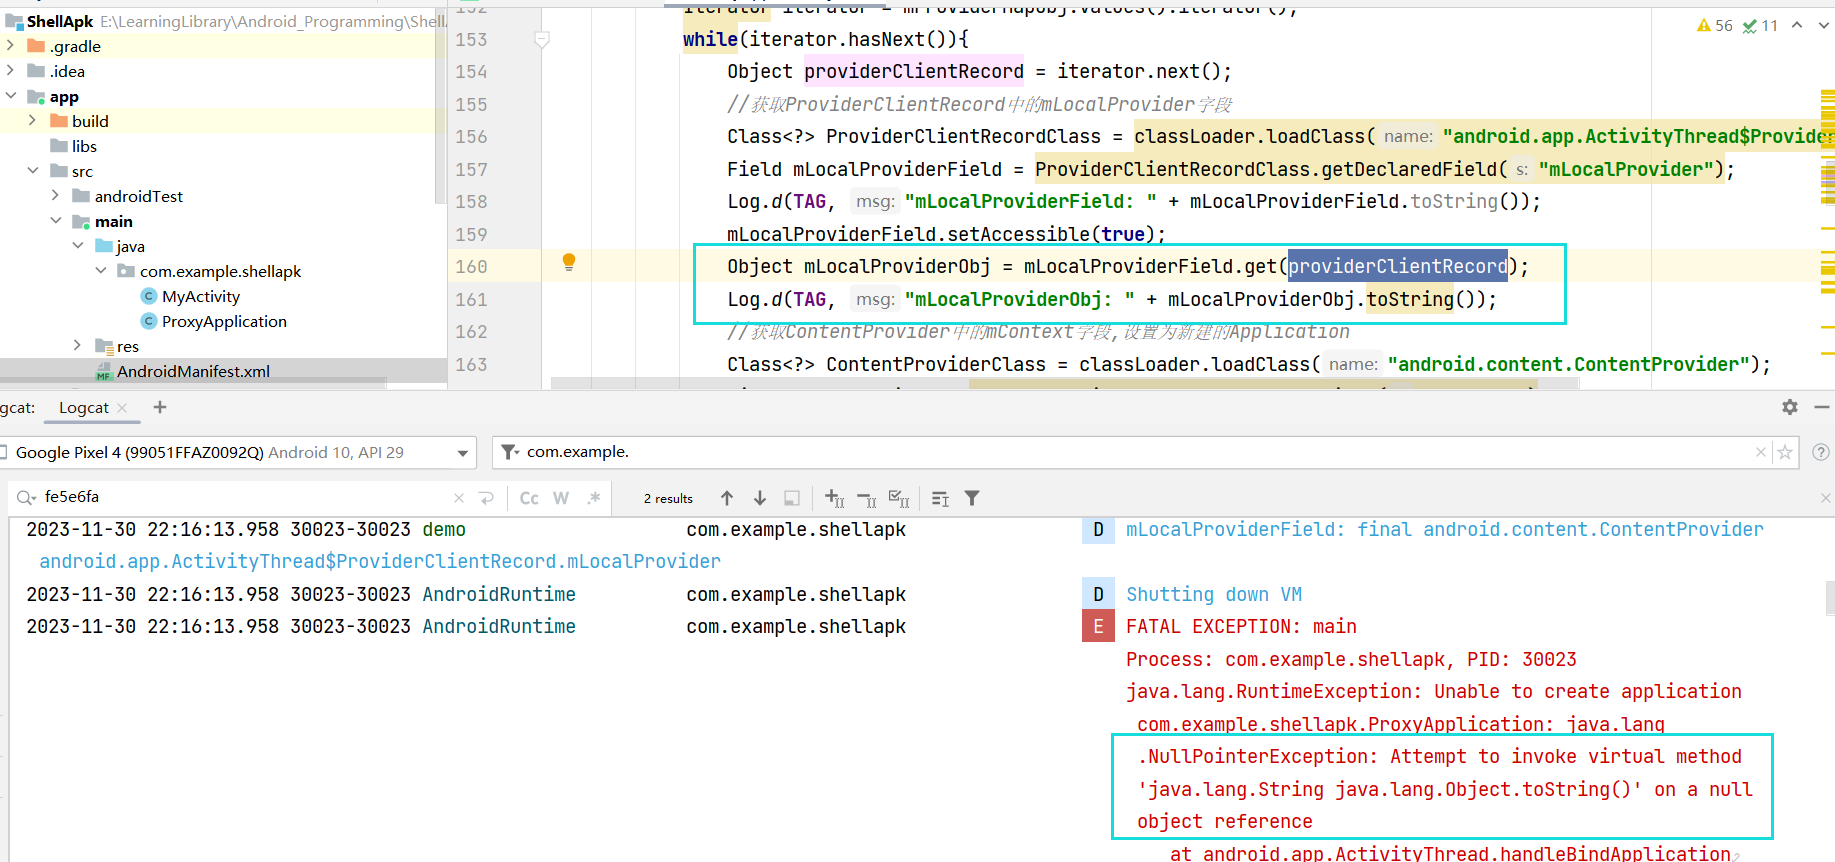
有的providerClientRecord对象中的mLocalProvider字段是空的!??
还以为是我的原因造成的呢。其实是可以为空的,那么我们只需要在获取到mLocalProvider对象后用加一层判断就行,代码如下:
1
2
3
4
5
6
7
8
9
10
11
12
13
14
15
16
17
18
19
20
21
22
23
|
Iterator iterator = mProviderMapObj.values().iterator();
Log.d(TAG, "iterator: " + iterator.toString());
while(iterator.hasNext()){
Object providerClientRecord = iterator.next();
Class<?> ProviderClientRecordClass = classLoader.loadClass("android.app.ActivityThread$ProviderClientRecord");
Field mLocalProviderField = ProviderClientRecordClass.getDeclaredField("mLocalProvider");
Log.d(TAG, "mLocalProviderField: " + mLocalProviderField.toString());
mLocalProviderField.setAccessible(true);
Object mLocalProviderObj = mLocalProviderField.get(providerClientRecord);
if(mLocalProviderObj != null){
Log.d(TAG, "mLocalProviderObj: " + mLocalProviderObj.toString());
Class<?> ContentProviderClass = classLoader.loadClass("android.content.ContentProvider");
Field mContextField = ContentProviderClass.getDeclaredField("mContext");
mContextField.setAccessible(true);
mContextField.set(mLocalProviderObj,app);
}
}
|
4.4. 问题四
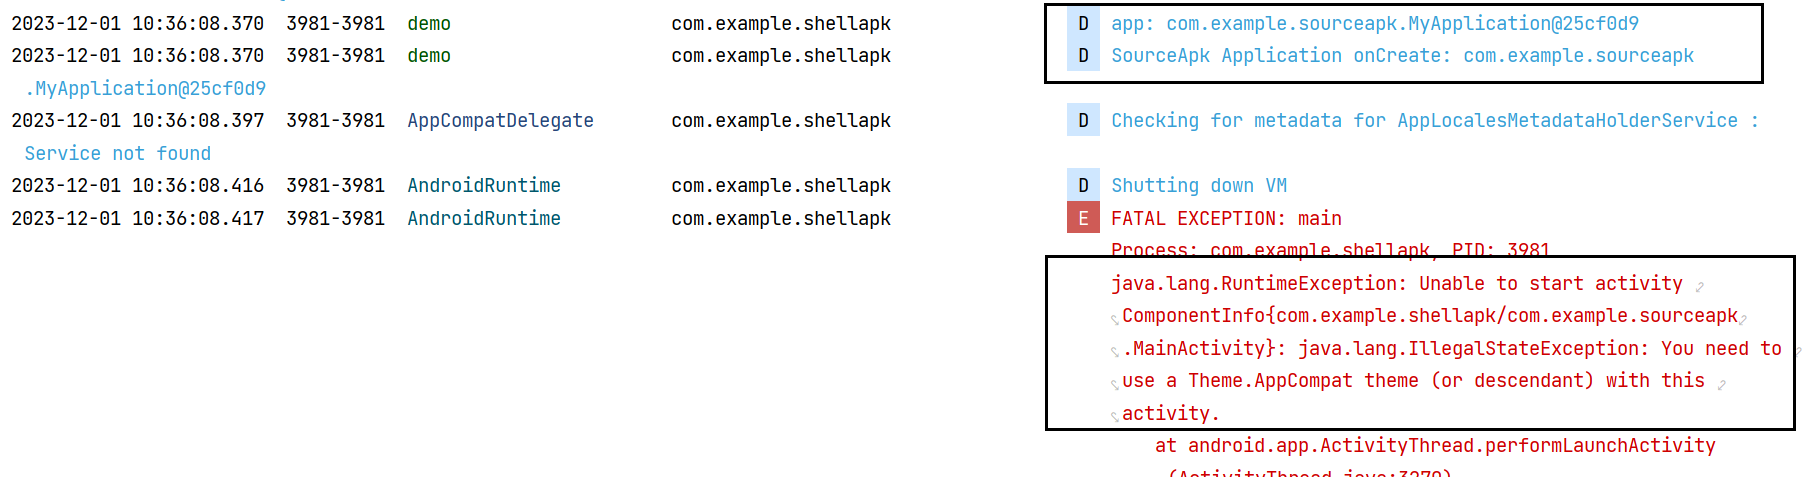
搜索了一下,源程序的MainActivity不应该继承自AppCompatActivity类,需要改成继承自Activity类,或者修改AndroidManifest.xml文件的主题。(参考解决You need to use a Theme.AppCompat theme (or descendant) with this activity.-CSDN博客)
我是直接改成继承自Activity类。
之后成功启动了:

其实到这里就已经可以说加壳脱壳成功了。但是!!!启动后的界面不容乐观
并非源程序的activity_main.xml中的界面。所以我将源程序activity_main.xml文件复制到壳程序的/res/layout目录下,但是下一个问题接踵而来。
4.5 问题五
复制粘贴过来的activity_main.xml有问题,字符串索引有问题??可是我是直接填字符串常量进去的啊,就根本没用字符串索引。
尝试之后,是把容器标签<androidx.constraintlayout.widget.ConstraintLayout>换成其他的就行,我换成了<LinearLayout>
1
2
3
4
5
6
7
8
9
10
11
12
13
14
15
| <?xml version="1.0" encoding="utf-8"?>
<LinearLayout xmlns:android="http://schemas.android.com/apk/res/android"
xmlns:app="http://schemas.android.com/apk/res-auto"
xmlns:tools="http://schemas.android.com/tools"
android:layout_width="match_parent"
android:layout_height="match_parent"
android:gravity="center"
tools:context="com.example.sourceapk.MainActivity">
<TextView
android:layout_width="wrap_content"
android:layout_height="wrap_content"
android:text="这是源程序!" />
</LinearLayout>
|
最终成功启动并展示出了源程序界面:

显然,在上述问题中,绝大数是我粗心造成的!😢
五、总结
花费了大概一周的时间,从一开始接触第一代壳,前前后后学了不少加壳所需的前置知识,终于在今日也是成功的制作出了一代壳。
在制作的过程中,还是有很多粗心的地方,一些大小写的问题导致动态加载类失败,当然也注意到反射所用的代码非常雷同,因此可以自定义一个反射类,像那些所参考的文章一样,这样代码就非常简洁了。另一个方面就是,我觉得上面的代码(或者说我所参考的代码)还可以进一步优化,有一些代码为什么这么做我搞不清楚,尚待考究。
还有就是在代码中反射来反射去的,那些所获取的实例我猜测应该都是同一个,例如LoadedApk、Application实例,存储他们的字段有很多,所以我想,接下来可以验证一下是不是如猜想一样。
不过我似乎理解了为什么第一代壳又被称为落地加载壳,这是因为它会把源程序从壳程序中分离出来并存储到文件系统中,所以才叫”落地“。由于这一特性,攻击者可以从文件系统中获取源程序。即使我们对源文件加载后删除,攻击者仍然可以通过拦截对应的删除函数阻止删除。
参考:
插件化之动态替换application.md
加壳App的运行流程及ClassLoader修正 | Security (svip.dev)
https://blog.csdn.net/xiangzhihong8/article/details/79724978
[原创]安卓加固方案从落地加载到类指令抽取编写报告-Android安全-看雪-安全社区|安全招聘|kanxue.com
Android 一二三代壳加固原理分析 - 简书 (jianshu.com)
Android中的Apk的加固(加壳)原理解析和实现 | 尼古拉斯.赵四 (520monkey.com)
[原创]Android App加固原理与技术历程-Android安全-看雪-安全社区|安全招聘|kanxue.com
从第一代到第五代,App加固技术详解 - 知乎 (zhihu.com)