一、前言 System进程和App进程都运行着一个或多个App,每个App都会有一个对应的Application对象(该对象跟LoadedApk一一对应)。下面分别解析以下两种进程创建Application的过程:
二、System Server进程 在Android系统启动流程 一文中,讲到过Zygote通过回调函数进入到System Server阶段,也就是调用了System Server的main()方法中,该方法中会调用run()方法,具体代码如下:
1 2 3 4 public static void main (String[] args) {new SystemServer ().run();
2.1 SystemServer.run() 1 2 3 4 5 6 7 8 9 10 11 12 13 14 15 16 17 18 19 20 21 22 23 24 25 26 27 28 29 30 31 32 33 private void run () {try {"android_servers" );new SystemServiceManager (mSystemContext);try {"StartServices" );throw new RuntimeException ("Main thread loop unexpectedly exited" );
在System Server的run()方法中,会调用createSystemContext()来创建系统的上下文。
2.2 createSystemContext() 1 2 3 4 5 6 7 8 9 private void createSystemContext () {ActivityThread activityThread = ActivityThread.systemMain();final Context systemUiContext = activityThread.getSystemUiContext();
调用了ActivityThread.systemMain()方法,以及getSystemContext()获取系统上下文、getSystemUiContext()获取系统UI上下文。
2.3 ActivityThread.systemMain() 1 2 3 4 5 6 7 8 9 10 11 12 public static ActivityThread systemMain () {if (!ActivityManager.isHighEndGfx()) {true );else {ActivityThread thread = new ActivityThread ();true );return thread;
2.4 ActivityThread初始化 1 2 3 4 5 6 7 8 9 10 11 12 13 14 15 16 17 public final class ActivityThread {private ContextImpl mSystemContext;private ContextImpl mSystemUiContext;final ApplicationThread mAppThread = new ApplicationThread ();private static volatile ActivityThread sCurrentActivityThread;boolean mSystemThread = false ;static volatile Handler sMainThreadHandler;
创建ActivityThread实例时,会初始化很多变量,其中有一个Application类的mInitialApplication对象,它的初始化分为两种情况:
System Server进程则是由ActivityThread.attach()过程赋值。
普通App进程则是由ActivityThread.handleBindApplication()过程赋值。
2.5 ActivityThread.attach() 1 2 3 4 5 6 7 8 9 10 11 12 13 14 15 16 17 18 19 20 21 private void attach (boolean system) {this ;if (!system) {else {try {new Instrumentation ();ContextImpl context = ContextImpl.createAppContext(this , getSystemContext().mPackageInfo);true , null );
传入的system参数为true,这意味着当前进程是系统进程,对应进入else分支,会实例化mInstrumentation和mInitialApplication对象。
2.6 getSystemContext() 1 2 3 4 5 6 7 8 9 public ContextImpl getSystemContext () {synchronized (this ) {if (mSystemContext == null ) {this );return mSystemContext;
调用createSystemContext()创建系统上下文。
2.6.1 createSystemContext() 1 2 3 4 5 6 7 8 9 10 11 12 static ContextImpl createSystemContext (ActivityThread mainThread) {LoadedApk packageInfo = new LoadedApk (mainThread);ContextImpl context = new ContextImpl (null , mainThread, packageInfo, null , null , null , 0 , null );return context;
创建LoadedApk对象和ContextImpl对象,并设置资源、更新资源配置。
2.6.1.1 LoadedApk初始化 1 2 3 4 5 6 7 8 9 10 11 12 13 14 15 16 17 18 19 20 21 22 23 24 25 26 27 28 29 30 31 32 33 34 35 36 37 38 39 40 41 42 43 44 45 public final class LoadedApk {private final ActivityThread mActivityThread;final String mPackageName;private ApplicationInfo mApplicationInfo;private String mAppDir;private String mResDir;private String[] mOverlayDirs;private String[] mSharedLibraries;private String mDataDir;private String mLibDir;private File mDataDirFile;private File mDeviceProtectedDataDirFile;private File mCredentialProtectedDataDirFile;private final ClassLoader mBaseClassLoader;private ClassLoader mClassLoader;private Application mApplication;public LoadedApk (ActivityThread activityThread, ApplicationInfo aInfo, CompatibilityInfo compatInfo, ClassLoader baseLoader, boolean securityViolation, boolean includeCode, boolean registerPackage) {new ApplicationInfo ();"android" ;"android" ;
LoadedApk主要是用来创建apk的相关信息,并集合成一个LoadedApk对象,其中相关信息包括:活动线程、包名、资源目录、共享库目录、类加载器等等。System Server进程走的是带一个参数的LoadedApk构造函数,其中比较重要的是将之前创建的ActivityThread实例赋值mActivityThread字段、创建ApplicationInfo对象、获取类加载器。
2.6.1.2 ContextImpl初始化 1 2 3 4 5 6 7 8 9 10 11 12 13 14 15 16 17 18 19 20 21 22 23 24 25 26 27 28 29 30 31 32 33 34 35 36 37 38 39 40 41 42 43 44 45 private ContextImpl (@Nullable ContextImpl container, @NonNull ActivityThread mainThread, @NonNull LoadedApk packageInfo, @Nullable String splitName, @Nullable IBinder activityToken, @Nullable UserHandle user, int flags, @Nullable ClassLoader classLoader) {this ;if ((flags & (Context.CONTEXT_CREDENTIAL_PROTECTED_STORAGE0 ) {final File dataDir = packageInfo.getDataDirFile();if (Objects.equals(dataDir, packageInfo.getCredentialProtectedDataDirFile())) {else if (Objects.equals(dataDir, packageInfo.getDeviceProtectedDataDirFile())) {if (user == null ) {if (container != null ) {else {ApplicationInfo ainfo = packageInfo.getApplicationInfo();if (ainfo.uid == Process.SYSTEM_UID && ainfo.uid != Process.myUid()) {else {new ApplicationContentResolver (this , mainThread, user);
传入的参数mainThread为之前创建的ActivityThread实例、参数packageInfo为刚刚创建的LoadedApk实例。
整个代码实际上是利用刚刚创建的LoadedApk实例来创建ContextImpl实例。
2.7 ContextImpl.createAppContext() 1 2 3 4 5 6 7 8 static ContextImpl createAppContext (ActivityThread mainThread, LoadedApk packageInfo) {if (packageInfo == null ) throw new IllegalArgumentException ("packageInfo" );ContextImpl context = new ContextImpl (null , mainThread, packageInfo, null , null , null , 0 , null );return context;
需要注意,传入的参数mainThread为之前创建的ActivityThread实例,参数packageInfo是ContextImpl实例(在2.6.1.2中创建的)中的mpackageInfo(在2.6.1.1中创建的)。
调用ContextImpl的构造函数再创建一次ContextImpl实例!?是因为一个是SystemContext一个是AppContext的缘故?
2.8 makeApplication() 在2.5中通过context.mPackageInfo.makeApplication(true, null)调用该方法,context.mPackageInfo是刚刚创建的LoadedApk实例(在2.6.1.1中创建的)。
1 2 3 4 5 6 7 8 9 10 11 12 13 14 15 16 17 18 19 20 21 22 23 24 25 26 27 28 29 30 31 32 33 34 35 36 public Application makeApplication (boolean forceDefaultAppClass, Instrumentation instrumentation) {if (mApplication != null ) {return mApplication;Application app = null ;String appClass = mApplicationInfo.className;if (forceDefaultAppClass || (appClass == null )) {"android.app.Application" ;try {ClassLoader cl = getClassLoader();if (!mPackageName.equals("android" )) {ContextImpl appContext = ContextImpl.createAppContext(mActivityThread, this );if (instrumentation != null ) {try {return app;
主要是获取appClass、创建类加载器和appContext,利用这些来创建Application对象。
2.9 getClassLoader() 1 2 3 4 5 6 7 8 9 public ClassLoader getClassLoader () {synchronized (this ) {if (mClassLoader == null ) {null );return mClassLoader;
如果类加载器不为空则调用createOrUpdateClassLoaderLocked()方法。
2.9.1 createOrUpdateClassLoaderLocked() 1 2 3 4 5 6 7 8 9 10 11 12 13 14 15 16 17 18 19 20 21 22 23 24 25 26 27 28 29 30 31 32 33 34 35 36 37 38 39 40 41 42 43 44 45 46 47 48 49 50 private void createOrUpdateClassLoaderLocked (List<String> addedPaths) {if (mPackageName.equals("android" )) {if (mClassLoader != null ) {return ;if (mBaseClassLoader != null ) {else {return ;if (mRegisterPackage) {final List<String> zipPaths = new ArrayList <>(10 );final List<String> libPaths = new ArrayList <>(10 );final boolean isBundledApp = mApplicationInfo.isSystemApp() && !mApplicationInfo.isUpdatedSystemApp();String libraryPermittedPath = mDataDir;if (isBundledApp) {"java.library.path" );final String librarySearchPath = TextUtils.join(File.pathSeparator, libPaths);if (!mIncludeCode) {final String zip = (zipPaths.size() == 1 ) ? zipPaths.get(0 ) : TextUtils.join(File.pathSeparator, zipPaths);boolean needToSetupJitProfiles = false ;if (mClassLoader == null ) {
2.9.2 ActivityManagerService.addPackageDependency() 1 2 3 4 5 6 7 8 9 10 11 12 13 14 15 16 17 18 19 20 21 22 public void addPackageDependency (String packageName) {synchronized (this ) {int callingPid = Binder.getCallingPid();if (callingPid == myPid()) {return ;synchronized (mPidsSelfLocked) {if (proc != null ) {if (proc.pkgDeps == null ) {new ArraySet <String>(1 );
2.9.3 makePaths() 1 2 3 4 5 6 7 8 9 10 11 12 13 14 15 16 17 18 19 20 21 22 23 24 25 26 27 28 29 30 31 32 33 34 35 36 37 38 39 40 41 42 43 44 45 46 47 48 49 50 51 52 53 54 55 56 57 58 59 60 61 62 63 64 65 66 67 68 69 70 71 72 73 74 75 76 77 78 79 80 81 82 83 84 85 86 87 88 89 90 91 92 93 94 95 96 public static void makePaths (ActivityThread activityThread, boolean isBundledApp, ApplicationInfo aInfo, List<String> outZipPaths, List<String> outLibPaths) {final String appDir = aInfo.sourceDir;final String libDir = aInfo.nativeLibraryDir;final String[] sharedLibraries = aInfo.sharedLibraryFiles;if (aInfo.splitSourceDirs != null && !aInfo.requestsIsolatedSplitLoading()) {if (outLibPaths != null ) {null ;if (activityThread != null ) {String instrumentationPackageName = activityThread.mInstrumentationPackageName;String instrumentationAppDir = activityThread.mInstrumentationAppDir;String instrumentationLibDir = activityThread.mInstrumentationLibDir;String instrumentedAppDir = activityThread.mInstrumentedAppDir;String instrumentedLibDir = activityThread.mInstrumentedLibDir;if (appDir.equals(instrumentationAppDir)if (!aInfo.requestsIsolatedSplitLoading()) {if (instrumentationSplitAppDirs != null ) {if (!instrumentationAppDir.equals(instrumentedAppDir)) {if (instrumentedSplitAppDirs != null ) {if (outLibPaths != null ) {if (!instrumentationLibDir.equals(instrumentedLibDir)) {if (!instrumentedAppDir.equals(instrumentationAppDir)) {if (outLibPaths != null ) {if (outLibPaths.isEmpty()) {if (aInfo.primaryCpuAbi != null ) {if (aInfo.targetSdkVersion < Build.VERSION_CODES.N) {"/system/fake-libs" + (VMRuntime.is64BitAbi(aInfo.primaryCpuAbi) ? "64" : "" ));for (String apk : outZipPaths) {"!/lib/" + aInfo.primaryCpuAbi);if (isBundledApp) {"java.library.path" ));if (sharedLibraries != null ) {for (String lib : sharedLibraries) {if (!outZipPaths.contains(lib)) {0 , lib);
2.9.4 ApplicationLoader.getClassLoader() 1 2 3 4 5 6 7 8 9 10 11 12 13 14 15 16 17 18 19 20 21 22 23 24 25 26 27 28 29 30 31 32 33 34 35 36 37 getClassLoader (String zip, int targetSdkVersion, boolean isBundled, String librarySearchPath, String libraryPermittedPath, ClassLoader parent) {return getClassLoader(zip, targetSdkVersion, isBundled, librarySearchPath, libraryPermittedPath, parent, zip);private ClassLoader getClassLoader (String zip, int targetSdkVersion, boolean isBundled, String librarySearchPath, String libraryPermittedPath, ClassLoader parent, String cacheKey) {ClassLoader baseParent = ClassLoader.getSystemClassLoader().getParent();synchronized (mLoaders) {if (parent == null ) {if (parent == baseParent) {ClassLoader loader = mLoaders.get(cacheKey);if (loader != null ) {return loader;PathClassLoader pathClassloader = PathClassLoaderFactory.createClassLoader(return pathClassloader;PathClassLoader pathClassloader = new PathClassLoader (zip, parent);return pathClassloader;
传入的参数parent(ClassLoader对象)为mBaseClassLoader,在SystemServer进程中LoadedApk初始化时是为null的,所以走if (parent == null) 分支,进而走if (parent == baseParent) 分支。
2.10 newApplication() 1 2 3 4 5 6 7 8 9 10 public Application newApplication (ClassLoader cl, String className, Context context) throws InstantiationException, IllegalAccessException, ClassNotFoundException {return newApplication(cl.loadClass(className), context);static public Application newApplication (Class<?> clazz, Context context) throws InstantiationException, IllegalAccessException, ClassNotFoundException {Application app = (Application)clazz.newInstance();return app;
传入的参数cl是在 2.9 处获得的PathClassLoader对象,参数className对应要加载的Application类(”android.app.Application”),最后通过反射获取到该类,然后调用newInstance()方法实例化Application。
2.10.1 Application.attach() 1 2 3 4 5 6 7 8 9 10 11 12 13 final void attach (Context context) {protected void attachBaseContext (Context base) {if (mBase != null ) {throw new IllegalStateException ("Base context already set" );
该方法主要功能:
将新创建的ContextImpl对象(2.8中创建的appContext)保存到Application的父类成员变量mBase;
将新创建的LoadedApk对象(2.8中创建的appContext中的mPackageInfo对象)保存到Application的父员变量mLoadedApk;
三、App进程 在Android应用程序启动流程(一) 一文中,应用程序同样也通过回调函数Zygote.MethodAndArgsCaller()进入到App运行阶段,即回调ActivityThread.main()方法。
3.1 ActivityThread.main() 1 2 3 4 5 6 7 8 public static void main (String[] args) {ActivityThread thread = new ActivityThread ();false );
在该方法中调用了thread.attach()方法。
3.2 ActivityThread.attach() 1 2 3 4 5 6 7 8 9 10 11 12 13 14 15 16 17 18 private void attach (boolean system) {this ;if (!system) {final IActivityManager mgr = ActivityManager.getService();try {else {
重点是mgr.attachApplication(mAppThread)。
3.3 ActivityManagerService.attachApplication() 1 2 3 4 5 6 7 8 9 10 11 12 13 public final void attachApplication (IApplicationThread thread) {synchronized (this ) {int callingPid = Binder.getCallingPid();final long origId = Binder.clearCallingIdentity();
接着调用attachApplicationLocked()方法给进程附加Application。
3.4 attachApplicationLocked() 1 2 3 4 5 6 7 8 9 10 11 12 13 14 15 16 17 18 19 20 21 22 23 24 25 26 27 28 29 30 31 32 33 34 35 36 private final boolean attachApplicationLocked (IApplicationThread thread, int pid) {long startTime = SystemClock.uptimeMillis();if (pid != MY_PID && pid >= 0 ) {synchronized (mPidsSelfLocked) {try {ApplicationInfo appInfo = app.instr != null ? app.instr.mTargetInfo : app.info;if (app.instr != null ) {new Configuration (getGlobalConfiguration()), app.compat,else {
代码很长,这里只关注thread.bindApplication()方法。
3.5 ActivityThread.bindApplication() 1 2 3 4 5 6 7 8 9 10 11 12 13 14 15 16 public final void bindApplication (String processName, ApplicationInfo appInfo, List<ProviderInfo> providers, ComponentName instrumentationName, ProfilerInfo profilerInfo, Bundle instrumentationArgs, IInstrumentationWatcher instrumentationWatcher, IUiAutomationConnection instrumentationUiConnection, int debugMode, boolean enableBinderTracking, boolean trackAllocation, boolean isRestrictedBackupMode, boolean persistent, Configuration config, CompatibilityInfo compatInfo, Map services, Bundle coreSettings, String buildSerial) {
对data对象进行了一系列的赋值,最终调用sendMessage()方法将BIND_APPLICATION消息添加到消息队列中,接着我们就需要看ActivityThread的handleMessage()方法了。
1 2 3 4 5 6 7 8 9 10 11 12 13 public void handleMessage (Message msg) {switch (msg.what) {case BIND_APPLICATION:AppBindData data = (AppBindData)msg.obj;break ;
主线程接收到BIND_APPLICATION消息,执行handleBindApplication()方法。
3.6 handleBindApplication() 1 2 3 4 5 6 7 8 9 10 11 12 13 14 15 16 17 18 19 20 21 22 23 24 25 26 27 28 29 30 31 32 private void handleBindApplication (AppBindData data) {final ContextImpl appContext = ContextImpl.createAppContext(this , data.info);try {Application app = data.info.makeApplication(data.restrictedBackupMode, null );try {try {finally {
主要是获取LoadedApk对象,借此创建ContextImpl对象(appContext)以及Application对象(app),并将创建好的app赋值给ActivityThread的mInitialApplication字段。
3.6.1 callApplicationOnCreate() 1 2 3 4 5 6 7 /frameworks/base/core/java/android/app/Instrumentation.javapublic void callApplicationOnCreate (Application app) {public void onCreate (Bundle arguments) {
3.7 getPackageInfoNoCheck() 1 2 3 4 5 6 7 8 9 10 11 12 13 14 15 16 17 18 19 20 21 22 23 24 25 26 27 28 29 30 31 32 33 34 35 36 37 38 39 40 41 42 43 44 45 46 47 48 49 50 public final LoadedApk getPackageInfoNoCheck (ApplicationInfo ai, CompatibilityInfo compatInfo) {return getPackageInfo(ai, compatInfo, null , false , true , false );private LoadedApk getPackageInfo (ApplicationInfo aInfo, CompatibilityInfo compatInfo, ClassLoader baseLoader, boolean securityViolation, boolean includeCode, boolean registerPackage) {final boolean differentUser = (UserHandle.myUserId() != UserHandle.getUserId(aInfo.uid));synchronized (mResourcesManager) {if (differentUser) {null ;else if (includeCode) {else {LoadedApk packageInfo = ref != null ? ref.get() : null ;if (packageInfo == null || (packageInfo.mResources != null new LoadedApk (this , aInfo, compatInfo, baseLoader,0 , registerPackage);if (mSystemThread && "android" .equals(aInfo.packageName)) {if (differentUser) {else if (includeCode) {new WeakReference <LoadedApk>(packageInfo));else {new WeakReference <LoadedApk>(packageInfo));return packageInfo;
创建LoadedApk对象,并将将新创建的LoadedApk加入到mPackages。也就是说每个app都会创建唯一的LoadedApk对象。此处aInfo来源于ProcessRecord.info变量,也就是进程中的第一个app。
3.7.1 installSystemApplicationInfo() 1 2 3 4 5 6 void installSystemApplicationInfo (ApplicationInfo info, ClassLoader classLoader) {assert info.packageName.equals("android" );
第二个参数通过getSystemContext().mPackageInfo.getClassLoader()获取的,对应LoadedApk对象中的ClassLoader。代码中很明显的一个特征就是比对packageName是否为”android”,而在System Server进程中创建的LoadedApk对象默认packageName为”android”。
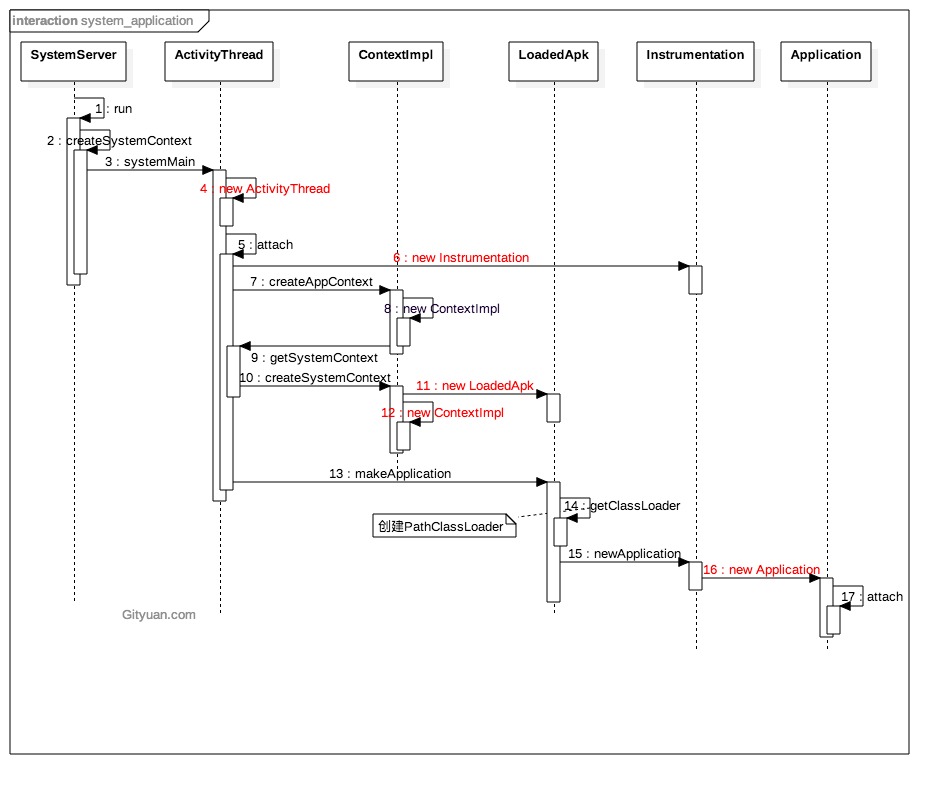
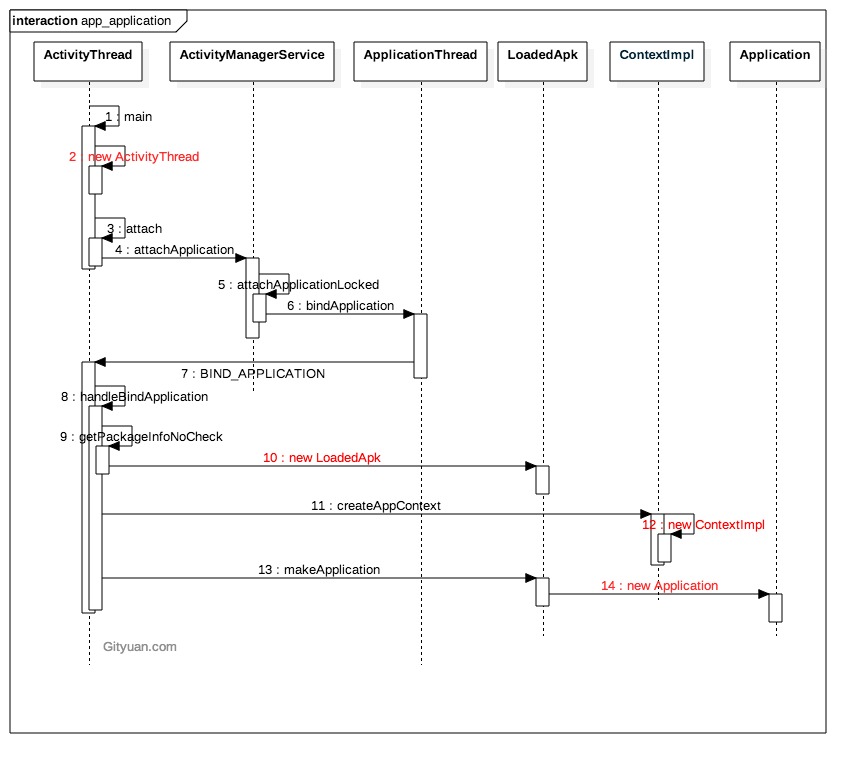
四、总结 LoadedApk与Application一一对应,Application借助LoadedApk创建的,并存放在LoadedApk的mApplication字段,而在创建Application的过程中,也将LoadedApk存放在Application的mLoadedApk字段(互相包含!?)。最后返回Application的时候,也将Application存放在ActivityThread中的mInitialApplication字段。
接下来借用gityuan的两种流程图:
参考:
http://androidxref.com/8.0.0_r4/xref/
https://gityuan.com/2017/04/02/android-application/
https://phantomvk.github.io/2019/07/23/Android_Application_class/
https://ljd1996.github.io/2019/12/16/Android-Application/