一、什么是Fragment
1.1 概述
Fragment是Android3.0后引入的一个新的API,它出现的初衷是为了适应大屏幕的平板电脑。开发者可以利用Fragment框架构建更灵活的界面,并在不同的设备上实现统一的用户体验。
Fragment可以看作是一个子Activity,它具有自己的生命周期,但必须寄生在Activity中才能运行,受Activity生命周期影响。
1.2 为什么会有Fragment?
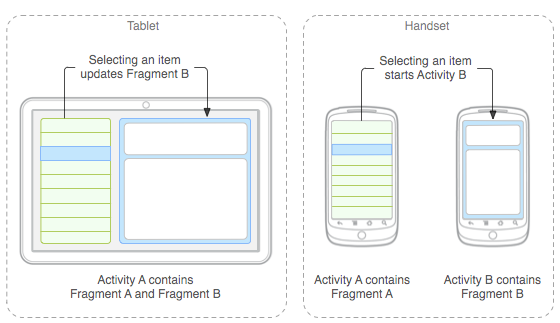
拿新闻板块举例。下图是使用平板和手机使用Fragment针对新闻板块的不同处理情况。
(来自菜鸟教程的图片)

显然对于平板来说,这么大的屏幕只放新闻简介就有点太浪费了,UI设计也不好看。但是利用两个Fragment,一个展示新闻简介,一个展示新闻具体内容,同时展现在屏幕上,那这样就合理利用了整个屏幕,UI设计也就好看多了。
同样的UI设计方案应用到手机上就不太行了,因为手机屏幕太小了。所以更合理的设计是展示新闻简介的Fragment先占据整个屏幕,当触发点击事件后,被展示新闻具体内容的Fragment覆盖。
二、Fragment的基本使用
2.1 静态加载Fragment
步骤如下:
- 通过
getSupportFragmentManager() 方法获取FragmentManager对象。
- 通过
FragmentManager.beginTransaction()方法获取FragmentTransaction对象。
- 调用
add()方法或这replace()方法加载 Fragment。
- 最后调用
commit()方法提交事务。
创建的fragmentone.xml、fragmenttwo.xml如下
1
2
3
4
5
6
7
8
9
10
11
12
13
14
15
16
17
18
19
20
21
22
23
24
25
26
27
|
<LinearLayout xmlns:android="http://schemas.android.com/apk/res/android"
android:layout_width="match_parent"
android:layout_height="match_parent"
android:gravity="center"
>
<TextView
android:id="@+id/fragmentone_tv"
android:layout_width="wrap_content"
android:layout_height="wrap_content"
android:text="今天星期四,懂?"
android:textSize="32sp"/>
</LinearLayout>
<LinearLayout xmlns:android="http://schemas.android.com/apk/res/android"
xmlns:tools="http://schemas.android.com/tools"
android:layout_width="match_parent"
android:layout_height="match_parent"
android:gravity="center"
>
<android.widget.Button
android:id="@+id/fragmenttwo_btn"
android:layout_width="200dp"
android:layout_height="120dp"
android:text="点击改变文字"
android:textSize="32sp" />
</LinearLayout>
|
然后在activity_main.xml中使用
1
2
3
4
5
6
7
8
9
10
11
12
13
14
15
16
17
18
19
20
21
22
23
24
| <LinearLayout
android:id="@+id/ll"
xmlns:android="http://schemas.android.com/apk/res/android"
android:layout_height="match_parent"
android:layout_width="match_parent"
android:orientation="horizontal"
android:gravity="center">
<fragment
android:name="com.example.myapplication.FragmentOne"
android:id="@+id/fragmentone"
android:layout_width="match_parent"
android:layout_height="match_parent"
android:layout_weight="1"
/>
<fragment
android:name="com.example.myapplication.FragmentTwo"
android:id="@+id/fragmenttwo"
android:layout_width="match_parent"
android:layout_height="match_parent"
android:layout_weight="1"
/>
</LinearLayout>
|
需要注意的是<fragment>标签中必须设置id和name(对应的自己创建的继承于Fragment的子类)
其中FragmentOne类和FragmentTwo类的实现如下
1
2
3
4
5
6
7
8
9
10
11
12
13
14
15
16
|
public class FragmentOne extends Fragment {
public View onCreateView(@NonNull LayoutInflater inflater, @Nullable ViewGroup container, @Nullable Bundle savedInstanceState) {
View FragmentOne = inflater.inflate(R.layout.fragmentone, container, false);
return FragmentOne;
}
}
public class FragmentTwo extends Fragment {
public View onCreateView(@NonNull LayoutInflater inflater, @Nullable ViewGroup container, @Nullable Bundle savedInstanceState) {
View FragmentTwo = inflater.inflate(R.layout.fragmenttwo, container, false);
return FragmentTwo;
}
}
|
先不设置两个Fragment的关联。
MainActivity.java中不需要任何代码设置。
2.2 动态加载Fragment
两个fragment的xml文件和fragment子类同上。只不过 activity_main.xml 中需要修改,不是使用<fragment>标签,而是<FrameLayout>标签,需要定义id,没有name属性。
1
2
3
4
5
6
7
8
9
10
11
12
13
14
15
16
17
18
19
20
21
22
| <LinearLayout
android:id="@+id/ll"
xmlns:android="http://schemas.android.com/apk/res/android"
android:layout_height="match_parent"
android:layout_width="match_parent"
android:orientation="vertical"
android:gravity="center">
<android.widget.Button
android:id="@+id/changefragmentbtn"
android:layout_width="match_parent"
android:layout_height="wrap_content"
android:text="change"/>
<FrameLayout
android:id="@+id/framelayout"
android:layout_width="match_parent"
android:layout_height="match_parent"
android:layout_weight="1"
android:background="@drawable/wallhaven"
/>
</LinearLayout>
|
通过点击按钮来更换fragment。
MainActivity.java需要做修改
1
2
3
4
5
6
7
8
9
10
11
12
13
14
15
16
17
18
19
20
21
22
23
24
25
26
27
28
29
30
31
32
33
34
35
36
37
38
39
| public class MainActivity extends AppCompatActivity implements View.OnClickListener{
private boolean flag = true;
@Override
protected void onCreate(Bundle savedInstanceState) {
super.onCreate(savedInstanceState);
setContentView(R.layout.activity_main);
Button btn = findViewById(R.id.changefragmentbtn);
btn.setOnClickListener(this);
}
@Override
public void onClick(View view) {
if (flag){
replaceFragment(new FragmentTwo());
flag = false;
} else {
replaceFragment(new FragmentOne());
flag = true;
}
}
private void replaceFragment(Fragment fragment) {
FragmentManager supportFragmentManager = getSupportFragmentManager();
FragmentTransaction fragmentTransaction = supportFragmentManager.beginTransaction();
fragmentTransaction.replace(R.id.framelayout, fragment);
fragmentTransaction.commit();
}
}
|
当然也可以不选择实现View.OnClickListener接口来实现点击事件处理方法,选择写成匿名函数也是可以。
2.3 Fragment回退栈
在2.2的例子中,如果我们点击back键,则会直接退出应用。如果我们要实现一层一层的退出 fragment 的话,需要使用到addToBackStack()方法。拿2.2的例子来讲,只需稍微修改replaceFragment()方法。
1
2
3
4
5
6
7
8
9
10
11
12
| private void replaceFragment(Fragment fragment) {
FragmentManager supportFragmentManager = getSupportFragmentManager();
FragmentTransaction fragmentTransaction = supportFragmentManager.beginTransaction();
fragmentTransaction.replace(R.id.framelayout, fragment);
fragmentTransaction.addToBackStack(null);
fragmentTransaction.commit();
}
|
这样当我们点击back键后,最上面的 fragment 事务会从堆栈中弹出。如果堆栈上没有 fragment 事务,则返回事件会向上传递到 Activity。
2.4 Fragment与Activity的交互
2.4.1 组件获取
- Fragment通过getActivity().findViewById(R.id.list)获得Activity中的组件。
- Activity通过getSupportFragmentManager().findFragmentByid获得Fragment中的组件(id和tag都行)。
2.4.2 数据传递
2.4.2.1 Fragment传递数据给Activity
步骤如下:
- 在Fragment定义一个接口,接口中定义抽象方法,你要传什么类型的数据参数就设置为什么类型
- 接着还有写一个调用接口中的抽象方法,把要传递的数据传过去
- 再接着就是Activity了,调用Fragment提供的那个方法,然后重写抽象方法的时候进行数据 的读取就可以了
(有点像UI开发笔记中的RecyclerView的item监听设置。)
案例还是使用2.2的代码,只进行一点点修改。
首先在fragment对应的类中,添加以下代码:
1
2
3
4
5
6
7
8
9
10
11
12
| private FragmentToActivity fta;
public interface FragmentToActivity{
void sentDataToActivity(String string);
}
public void getDataFromFragment(FragmentToActivity fta) {
this.fta = fta;
String msg = "Hello! I'm from Fragment";
fta.sentDataToActivity(msg);
}
|
然后在MainActivity.java中的onClick方法中添加以下代码
1
2
3
4
5
6
| fragmentOne.getDataFromFragment(new FragmentOne.FragmentToActivity() {
@Override
public void sentDataToActivity(String string) {
Toast.makeText(MainActivity.this, string, Toast.LENGTH_SHORT).show();
}
});
|
2.4.2.1 Activity传递数据给Fragment
步骤如下:
- 在Activity中创建Bundle数据包,将数据放入Bundle中。
- 调用Fragment实例的setArguments(bundle) 从而将Bundle数据包传给Fragment。
- 然后Fragment中调用getArguments获得 Bundle对象,,然后进行解析就可以了。
仍然以 2.2 的代码为例,我们来尝试修改fragment的内容。
在MainActivity.java中,需要稍微修改一下代码。
1
2
3
4
5
6
7
8
9
10
11
12
13
14
15
16
17
18
19
| protected void onCreate(Bundle savedInstanceState) {
super.onCreate(savedInstanceState);
setContentView(R.layout.activity_main);
Button btn = findViewById(R.id.changefragmentbtn);
btn.setOnClickListener(this);
fragmentOne = new FragmentOne();
fragmentTwo = new FragmentTwo();
bundleone = new Bundle();
bundletwo = new Bundle();
bundleone.putString("message","我是秦始皇,打钱!");
bundletwo.putString("message","封我做大将军嘞");
fragmentOne.setArguments(bundleone);
fragmentTwo.setArguments(bundletwo);
}
|
主要改变的是onCreate方法,onClick方法就不需要在创建新的fragment对象,而是使用创建的公共对象。
补充!
不建议将new FragmentOne()出的对象作为公共对象作为fragmentTransaction.add()的参数,这样会导致应用切换出问题。但replace()不会。
然后只需要在fragment子类中的onCreateView方法中额外添加以下代码
1
2
3
4
5
6
| textview = FragmentOne.findViewById(R.id.fragmentone_tv);
Bundle bunlde = this.getArguments();
message = bunlde.getString("message");
textview.setText(message);
|
2.4.2.1 Fragment传递数据给Fragment
如果 是一个Fragment 跳转到另一个Fragment,那么可以使用Bundle通信,因为涉及到Fragment的添加,所以还需要FragmentManager。示例代码如下(来自菜鸟教程):
1
2
3
4
5
6
7
8
9
10
| FragmentManager fManager = getSupportFragmentManager( );
FragmentTransaction fTransaction = fManager.beginTransaction();
Fragmentthree t1 = new Fragmentthree();
Fragmenttwo t2 = new Fragmenttwo();
Bundle bundle = new Bundle();
bundle.putString("key",id);
t2.setArguments(bundle);
fTransaction.add(R.id.fragmentRoot, t2, "~~~");
fTransaction.addToBackStack(t1);
fTransaction.commit();
|
如果是两个Fragment需要即时传数据,而非跳转的话,就需要以Activity为媒介,即先在Activity获得fragment1传过来的数据,再传到fragment2中。
这个实现的话感觉是将 2.4.2.1 和 2.4.2.2 中的方法拼接一下。
三、Fragment生命周期
3.1 Fragment生命周期的方法
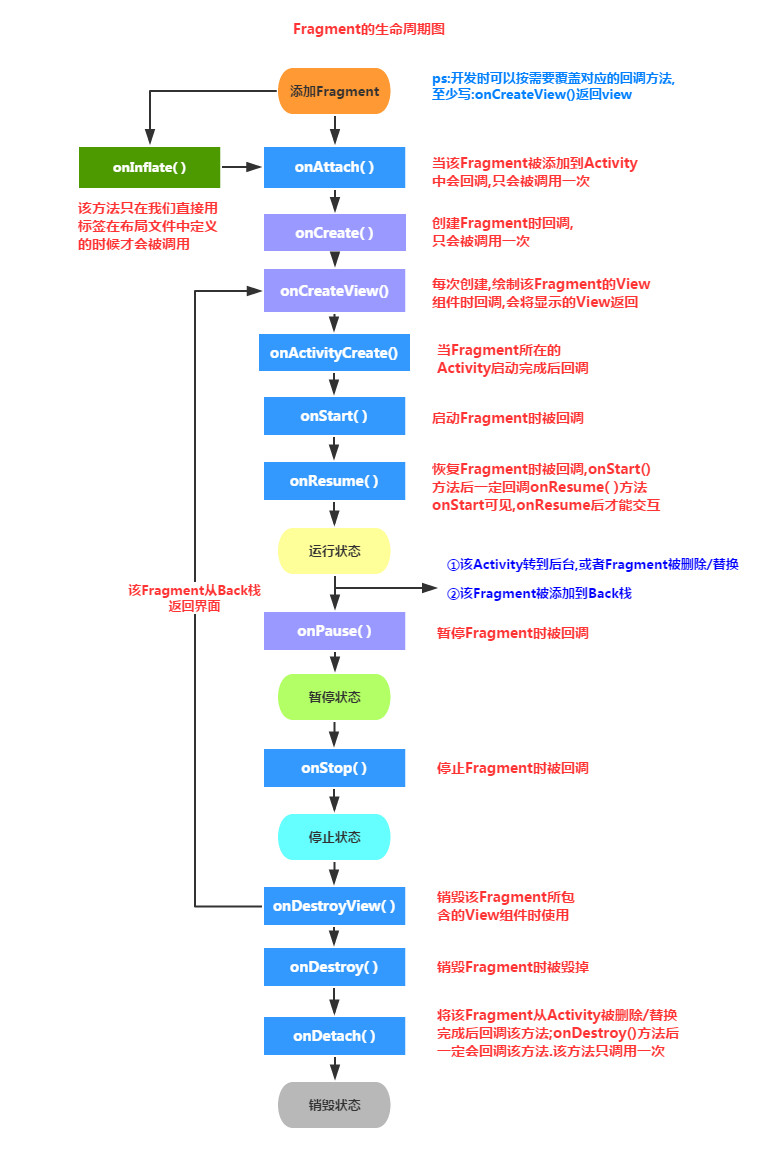
部分方法解释如下:
- onAttach():因为Fragment必须依托Activity才能运行,所以该方法的功能是将Fragment与Activity绑定。
- onCreate():创建Fragment。
- onCreateView():因为Fragment是有UI界面的,所以该方法的功能是绘制Fragment的UI界面。
- onActivityCreate():Fragment所在的Activity启动完成后才会被调用。
- onDestroyView():销毁Fragment的UI视图
- onDestroy() :销毁Fragment。
- onDetach():Fragment与Activity解绑。
(来自菜鸟教程的图片)

由此可见,Fragment的运行必须在onAttach()和onDetach()之间,因为Fragment不能独立运行,必须依赖Activity。
3.2 体验Fragment的生命周期
1
2
3
4
5
6
7
8
9
10
11
12
13
14
15
16
17
18
19
20
21
22
23
24
25
26
27
28
29
30
31
32
33
34
35
36
37
38
39
40
41
42
43
44
45
46
47
48
49
50
51
52
53
54
55
56
57
58
59
60
61
62
63
64
65
66
67
68
69
70
71
72
73
74
75
| public class FragmentOne extends Fragment{
private static final String TAG = "lll";
@Override
public void onAttach(@NonNull Context context) {
super.onAttach(context);
Log.d(TAG, "onAttach: ");
}
@Override
public void onCreate(@Nullable Bundle savedInstanceState) {
super.onCreate(savedInstanceState);
Log.d(TAG, "onCreate: ");
}
@Nullable
@Override
public View onCreateView(@NonNull LayoutInflater inflater, @Nullable ViewGroup container, @Nullable Bundle savedInstanceState) {
View FragmentOne = inflater.inflate(R.layout.fragmentone, container, false);
Log.d(TAG, "onCreateView: ");
return FragmentOne;
}
@Override
public void onActivityCreated(@Nullable Bundle savedInstanceState) {
super.onActivityCreated(savedInstanceState);
Log.d(TAG, "onActivityCreated: ");
}
@Override
public void onStart() {
super.onStart();
Log.d(TAG, "onStart: ");
}
@Override
public void onResume() {
super.onResume();
Log.d(TAG, "onResume: ");
}
@Override
public void onPause() {
super.onPause();
Log.d(TAG, "onPause: ");
}
@Override
public void onStop() {
super.onStop();
Log.d(TAG, "onStop: ");
}
@Override
public void onDestroyView() {
super.onDestroyView();
Log.d(TAG, "onDestroyView: ");
}
@Override
public void onDestroy() {
super.onDestroy();
Log.d(TAG, "onDestroy: ");
}
@Override
public void onDetach() {
super.onDetach();
Log.d(TAG, "onDetach: ");
}
}
|
通过观察Logcat中的信息,可以知道:
- 从无到有显示Fragment:onAttach() -> onCreate() -> onCreateView() -> onActivityCreated() -> onStart() -> onResume()
- 基于1,之后按下home键:onPause() -> onStop()
- 基于2,重新进入:onStart() -> onResume()
- 基于3,按回退键:onPause() -> onStop() -> onDestroyView() -> onDestroy() -> onDetach()
- 被另一个UI完全替换:onPause() -> onStop() -> onDestroyView()
- 基于5,直接退出应用:onDestroy() -> onDetach()
- 基于5,再次替换回来:onCreateView() -> onActivityCreated() -> onStart() -> onResume()
实现页面滑动能够与底部导航栏进行同步。
当然,BottomNavigationView已经实现了这一功能,以后使用这个组件即可,就不需要那么麻烦了。
话不多说,开始实操!
首先编写activity_main.xml的内容:
1
2
3
4
5
6
7
8
9
10
11
12
13
14
15
16
17
18
19
20
21
22
23
24
25
26
27
28
29
30
31
32
33
34
35
36
37
38
39
40
41
42
43
44
45
46
47
48
49
50
51
52
53
54
55
56
57
58
59
60
61
62
63
64
65
66
67
68
69
70
71
72
73
74
75
76
77
78
79
80
81
82
83
84
85
86
87
88
89
90
91
92
93
94
95
96
97
98
99
100
101
102
103
104
105
106
107
108
109
110
111
112
113
114
115
116
| <LinearLayout
xmlns:android="http://schemas.android.com/apk/res/android"
xmlns:app="http://schemas.android.com/apk/res-auto"
xmlns:tools="http://schemas.android.com/tools"
android:layout_width="match_parent"
android:layout_height="match_parent"
tools:context=".MainActivity"
android:orientation="vertical">
<androidx.viewpager2.widget.ViewPager2
android:id="@+id/id_viewpager"
android:layout_width="match_parent"
android:layout_height="0dp"
android:layout_weight="1"/>
<LinearLayout
android:layout_width="match_parent"
android:layout_height="wrap_content"
android:orientation="horizontal"
android:gravity="center"
>
<LinearLayout
android:id="@+id/id_chatlayout"
android:layout_width="match_parent"
android:layout_height="match_parent"
android:layout_weight="1"
android:orientation="vertical"
android:gravity="center"
>
<ImageView
android:id="@+id/id_chatimage"
android:src="@drawable/baseline_message_24"
android:layout_width="wrap_content"
android:layout_height="wrap_content"
app:tint="@color/buttoncolorchange"/>
<TextView
android:layout_width="wrap_content"
android:layout_height="wrap_content"
android:text="微信"
android:textSize="24sp"
/>
</LinearLayout>
<LinearLayout
android:id="@+id/id_contactlayout"
android:layout_width="match_parent"
android:layout_height="match_parent"
android:layout_weight="1"
android:orientation="vertical"
android:gravity="center"
>
<ImageView
android:id="@+id/id_contactimage"
android:src="@drawable/baseline_contacts_24"
android:layout_width="wrap_content"
android:layout_height="wrap_content"
app:tint="@color/buttoncolorchange"/>
<TextView
android:layout_width="wrap_content"
android:layout_height="wrap_content"
android:text="联系人"
android:textSize="24sp"
/>
</LinearLayout>
<LinearLayout
android:id="@+id/id_findlayout"
android:layout_width="match_parent"
android:layout_height="match_parent"
android:layout_weight="1"
android:orientation="vertical"
android:gravity="center"
>
<ImageView
android:id="@+id/id_findimage"
android:src="@drawable/baseline_compass_calibration_24"
android:layout_width="wrap_content"
android:layout_height="wrap_content"
app:tint="@color/buttoncolorchange"/>
<TextView
android:layout_width="wrap_content"
android:layout_height="wrap_content"
android:text="发现"
android:textSize="24sp"
/>
</LinearLayout>
<LinearLayout
android:id="@+id/id_melayout"
android:layout_width="match_parent"
android:layout_height="match_parent"
android:layout_weight="1"
android:orientation="vertical"
android:gravity="center"
>
<ImageView
android:id="@+id/id_meimage"
android:src="@drawable/baseline_account_box_24"
android:layout_width="wrap_content"
android:layout_height="wrap_content"
app:tint="@color/buttoncolorchange"/>
<TextView
android:layout_width="wrap_content"
android:layout_height="wrap_content"
android:text="我"
android:textSize="24sp"
/>
</LinearLayout>
</LinearLayout>
</LinearLayout>
|
整体布局为:底部为导航栏,其余空间给viewpager2。导航栏分四个按钮(跟微信一样),其中ImageView的tint属性可以实现图片颜色的变化,这样就不需要用到两张图来切换了,buttoncolorchange.xml 的内容如下:
1
2
3
4
| <selector xmlns:android="http://schemas.android.com/apk/res/android">
<item android:color="#5cd849" android:state_selected="true"/>
<item android:color="#ffffff"/>
</selector>
|
底部导航栏的四个按钮分别有对应的四个页面(fragment),它们通过FragmentAdapter以及Fragment来实现,对应的xml文件我写的比较简陋,就一个TextView。(这个文件通过创建Fragment类会自动生成,不需要自己再创建)
1
2
3
4
5
6
7
8
9
10
11
12
13
14
15
16
17
| <FrameLayout xmlns:android="http://schemas.android.com/apk/res/android"
xmlns:tools="http://schemas.android.com/tools"
android:layout_width="match_parent"
android:layout_height="match_parent"
tools:context=".WechatFragment">
<TextView
android:id="@+id/id_textView"
android:layout_width="match_parent"
android:layout_height="match_parent"
android:textSize="32sp"
android:layout_gravity="center"
android:gravity="center"
android:textColor="#FFFF00"
/>
</FrameLayout>
|
既然使用了Viewpager2和Fragment,那么就要编写对应的FragmentAdapter和Fragment类。其中Viewpage的Adapter编写如下(需要注意继承的是FragmentStateAdapter):
1
2
3
4
5
6
7
8
9
10
11
12
13
14
15
16
17
18
19
20
| public class WechatViewAdapter extends FragmentStateAdapter {
private List<Fragment> fragmentList;
public WechatViewAdapter(@NonNull FragmentManager fragmentManager, @NonNull Lifecycle lifecycle, List<Fragment> fragmentList) {
super(fragmentManager, lifecycle);
this.fragmentList = fragmentList;
}
@NonNull
@Override
public Fragment createFragment(int position) {
return fragmentList.get(position);
}
@Override
public int getItemCount() {
return fragmentList == null ? 0 : fragmentList.size();
}
}
|
Fragment对应的Fragment类编写如下:
1
2
3
4
5
6
7
8
9
10
11
12
13
14
15
16
17
18
19
20
21
22
23
24
25
26
27
28
29
30
31
32
33
34
35
36
37
38
39
40
41
42
43
44
45
| public class WechatFragment extends Fragment {
private static final String ARG_PARAM1 = "key1";
private View rootView;
private String mParam1;
public static WechatFragment newInstance(String param1) {
WechatFragment fragment = new WechatFragment();
Bundle args = new Bundle();
args.putString(ARG_PARAM1, param1);
fragment.setArguments(args);
return fragment;
}
@Override
public void onCreate(Bundle savedInstanceState) {
super.onCreate(savedInstanceState);
if (getArguments() != null) {
mParam1 = getArguments().getString(ARG_PARAM1);
}
}
@Override
public View onCreateView(LayoutInflater inflater, ViewGroup container,
Bundle savedInstanceState) {
if (rootView == null){
rootView = inflater.inflate(R.layout.fragment_wechat, container, false);
}
initView();
return rootView;
}
private void initView() {
TextView textView = rootView.findViewById(R.id.id_textView);
textView.setText(mParam1);
}
}
|
当然,对于这个实战来讲,其实可以不用写那么复杂。
因为四个页面我使用的都是相同的fragment的xml文件,所以这里创建一个fragment类即可。
最主要的是MainActivity.java,代码如下:
1
2
3
4
5
6
7
8
9
10
11
12
13
14
15
16
17
18
19
20
21
22
23
24
25
26
27
28
29
30
31
32
33
34
35
36
37
38
39
40
41
42
43
44
45
46
47
48
49
50
51
52
53
54
55
56
57
58
59
60
61
62
63
64
65
66
67
68
69
70
71
72
73
74
75
76
77
78
79
80
81
82
83
84
85
86
87
88
89
90
91
92
93
94
95
96
97
98
99
100
101
102
103
104
105
106
107
108
109
110
111
112
113
114
115
116
117
| public class MainActivity extends AppCompatActivity implements View.OnClickListener{
private List<Fragment> fragmentList;
private ViewPager2 viewpager;
private ArrayList<LinearLayout> linearLayoutArrayList;
private ArrayList<ImageView> imageViewArrayList;
private ImageView currentImageView;
@Override
protected void onCreate(Bundle savedInstanceState) {
super.onCreate(savedInstanceState);
setContentView(R.layout.activity_main);
initPager();
initBottomNavigation();
}
private void initPager() {
viewpager = findViewById(R.id.id_viewpager);
fragmentList = new ArrayList<>();
fragmentList.add(WechatFragment.newInstance("聊天"));
fragmentList.add(WechatFragment.newInstance("通讯录"));
fragmentList.add(WechatFragment.newInstance("发现"));
fragmentList.add(WechatFragment.newInstance("我的"));
WechatViewAdapter wechatViewAdapter = new WechatViewAdapter(getSupportFragmentManager(), getLifecycle(), fragmentList);
viewpager.setAdapter(wechatViewAdapter);
viewpager.registerOnPageChangeCallback(new ViewPager2.OnPageChangeCallback() {
@Override
public void onPageSelected(int position) {
super.onPageSelected(position);
chageBottomNavigationItem(position);
}
});
}
private void initBottomNavigation() {
linearLayoutArrayList = new ArrayList<>();
linearLayoutArrayList.add(findViewById(R.id.id_chatlayout));
linearLayoutArrayList.add(findViewById(R.id.id_contactlayout));
linearLayoutArrayList.add(findViewById(R.id.id_findlayout));
linearLayoutArrayList.add(findViewById(R.id.id_melayout));
for (LinearLayout each : linearLayoutArrayList) {
each.setOnClickListener(this);
}
imageViewArrayList = new ArrayList<>();
imageViewArrayList.add(findViewById(R.id.id_chatimage));
imageViewArrayList.add(findViewById(R.id.id_contactimage));
imageViewArrayList.add(findViewById(R.id.id_findimage));
imageViewArrayList.add(findViewById(R.id.id_meimage));
currentImageView = imageViewArrayList.get(0);
currentImageView.setSelected(true);
}
@Override
public void onClick(View view) {
chageBottomNavigationItem(view.getId());
}
private void chageBottomNavigationItem(int positon) {
currentImageView.setSelected(false);
if (positon == R.id.id_chatlayout) {
viewpager.setCurrentItem(0);
currentImageView = imageViewArrayList.get(0);
} else if (positon == 0) {
currentImageView = imageViewArrayList.get(0);
} else if (positon == R.id.id_contactlayout) {
viewpager.setCurrentItem(1);
currentImageView = imageViewArrayList.get(1);
} else if (positon == 1) {
currentImageView = imageViewArrayList.get(1);
} else if (positon == R.id.id_findlayout) {
viewpager.setCurrentItem(2);
currentImageView = imageViewArrayList.get(2);
} else if (positon == 2) {
currentImageView = imageViewArrayList.get(2);
} else if (positon == R.id.id_melayout) {
viewpager.setCurrentItem(3);
currentImageView = imageViewArrayList.get(3);
} else if (positon == 3) {
currentImageView = imageViewArrayList.get(3);
}
currentImageView.setSelected(true);
}
}
|

